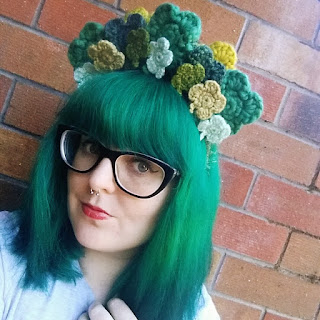
Since I dyed my hair green in January, I have had people telling me that I'm "a bit too early for St Patrick's Day!". So I decided to just embrace it and make myself a huge and slightly ridiculous four-leaf clover headband to wear! If you want to make your own, it is quick and easy and you could most definitely finish it before St Patrick's Day ^___^
Materials needed:
- assorted green yarn (including a fluffy novelty yarn)
- crochet hooks to match yarns
- yarn scissors
- tapestry needle
- scrap cardboard
- pencil
- paper scissors
- hot glue gun
To start, you will need some green yarn. I went through my stash and pulled out as many different shades of green as I could find. They are all different weights and are a mix of acrylic and wool - and that is ok! You will only be using small amounts of each colour, so small stash balls are perfect for this project. Also, make sure you pull out a selection of crochet hooks so that you can match the hook to the yarn.
I used Twinkie Chan's free lucky clover pattern to make my clovers; it's a nice and easy pattern and once you've made a couple, you probably won't even need to read the pattern to make each one. I had six different yarns for my clovers and I made three clovers for each colour so I had eighteen clovers total. The amount you need will depend on how big your clovers are and how extreme you want to go with your headband ~___^
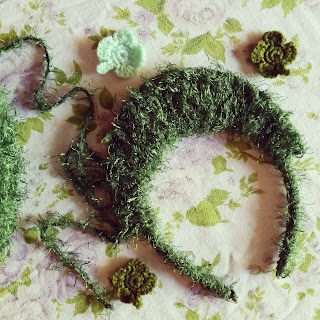
Next, you need some scrap cardboard; I pulled a small box out of our recycling bin and cut it into an arch shape. I used the top of the headband to determine the bottom curve of the arch but then free handed the rest. It's ok if it is a little lopsided, but the closer to even you can get it the better ^___^
Use hot glue to attach the cardboard to the headband and then wrap the headband and cardboard arch with more yarn. I used Moda Vera Honey Joy (100% polyester, colour number 08) which is a fluffy novelty yarn which reminds me of moss. I don't know what project I originally had planned for this yarn, but I was pleased to find it in my stash! I put a small amount of hot glue on the end of the headband, stuck the yarn down and then began winding it all over the headband. You may need to add small amounts of hot glue on the cardboard arch as well, to prevent the yarn from slipping down.
Once your headband is completely covered, you can begin to stick the clovers on with hot glue!
Ta-da!
I had much more clovers than I needed so I added some to the back as well! I still have one large light green clover left so I may make myself a matching brooch ^___^
I'm not going to lie - this headband is pretty massive! But I really love it. Good luck and no pinches, what's not to like? ~___^
- Lisa xx


