Sunday, 29 July 2012

Dinosaur Desk Set


Hey! I hope you're having an awesome weekend ^_^ I'm so excited to finally show you this project! I really love all the neon dinosaur planters that I've been seeing around, but our house doesn't have much natural light and I'm not allowed plants at my work desk so I decided to make something a bit different.


I made a desk set from three plastic dinosaurs! Yay! I think they look super ^_^
 

The green Stegosaurus is for holding paperclips. The inside compartment is lined with a flexible magnet which I got in the mail as a calender from a real estate company (I'm sorry, happy smiling man, for cutting into your incredibly shiny teeth and the month of March) so the paperclips will stay in place. 
 

The blue Triceratops is a sticky tape dispenser. I'm so happy that this actually works! I thought that the sticky tape wasn't actually able to spin properly and I went to bed feeling like a failure but then went I tried it again in the morning, it worked! Yay! Thankyou, craft fairies ~_^
 

And the pink Velociraptor holds pens ... in a spray-painted giant tic-tac box. Hey, whatever works, right?

Anyway, what do you think? I really hope you like them! ^_^

- Lisa

Thursday, 26 July 2012

Sock money and a repainted case


Hey! I made some more things for the Harry Potter Craft-a-long ^_^


First up: I finally made a sock monkey! Yay! I think it turned out pretty well for my first attempt and now I totally want to make more ^_^

I don't know what to call it though; any ideas?

Next, this isn't really a proper craft, but when I first painted this case I used poster paint which was a terrible, terrible idea. Everytime I touched the case I ended up with black marks all over my hands and the paint just kept flaking off the bamboo handle. So uncool. So I covered up the illustration with paper and painter's tape and then spray-painted the whole thing in metallic charcoal.

I think it turned out pretty well, although there are a few places where the texture is a little weird.

And the picture still looks good. Apart from the smudges which were made by the poster paint from when I first attached it. *waves fist in air* Damn you poster paint!
I can't wait for the weekend - I have more finished projects to show you! Have a great rest of the week! ^_^
- Lisa x

Sunday, 22 July 2012

Raincloud brooch, tentacle earrings, Death Star necklace, and skeleton lady cameo necklaces


Hey! I made a quite a lot of jewellery yesterday; I seem to go through phases of making things and recently I've just been like "EVERYTHING can be a brooch/necklace/earring". Anyway, here are some kinda dark photos (it's so cloudy here today!).


This raincloud brooch is for the Harry Potter Craft-a-long; the challenge was to create something inspired by water. 
 

The cloud and raindrops are made from Sculpy, painted with spray paint, and then attached to tiger tail (jewellery wire) with Amazing Goop. Honestly, this glue is like my new favourite thing. It takes a while to dry but after that, the things glued will never move again. Well, I hope anyway ~_^ The badge back was also attached with the Goop.


These earrings are also for the Craft-a-long, for a craft with a symbolic meaning. Apparently sailors used to carry octopus medallains for good luck and to ward off evil. I don't know if it works with just the tentacles, but I mainly like them because they look cool so that's ok ^_^


The tentacles are also made from Sculpy and spray paint. They look pretty spiffy and shiny, which I like ^_^

The Astronomy challenge for the Craft-a-long was to make something inspired by the moon, sun, or stars. I went with the moon, and a slightly edited version of the phrase that features in René Magritte's famous pipe painting.

On the other side is the Death Star ~_^
This necklace is also made from Sculpey. I hope with all this practice my clay modelling skills will improve! ^_^

And lastly, I made these pendants just by gluing cameos onto bevels. Easy peasy! I really like how they turned out ^_^

How was your weekend?

- Lisa x

Thursday, 12 July 2012

Faux letterpress blocks


Hey! I think letterpress blocks look super cool, and I've seen so many great ways of adding them to your home decor. But because they're so popular, they can be hard to get your hands on. So, I decided to make my own! And now you can too! ^_^ 


I didn't take any photos of the process, but it is so easy that I don't think you will really need any ^_^

Step 1. Buy some craft letters. I got mine from Spotlight and they were $2 each; you should be able to find them at any craft or hobby store.
Step 2. Get some blocks that are just big enough to fit the letters on them. My blocks are balsa wood and I brought them pre-cut in a pack of six from the craft store. Balsa wood is great for this project because it absorbs paint really well, but you can use anything that you have access to.


Step 3. Glue the letters to the blocks. If you use hot-glue, like I did, be careful not to use too much because if it leaks out from under the letters you will find it difficult to paint afterwards. Also, make sure you glue your letters on backwards! I kept forgetting and putting them on the right way >_<
Step 4. Distress your blocks a bit. I sanded the edges so they didn't have such perfect corners, hit the blocks with the edges of a hammer to leave indents, and made some scores with a blunt knife.

Step 5. Paint your blocks and letters with wood stain. I used a cedar stain. The instructions on the tin will tell you how many layers to do; mine said to do two.
Step 6. Make a wash with black acrylic paint and water. You only need to use a tiny bit of paint for this; I just got a little bit of paint on my brush and then swished it into a couple of teaspoons of water, like you would do if you were cleaning it. 


Step 7. Paint the letters and blocks with the wash. The wash will make the indents and knife marks darker than other parts, which will add to the vintage look.
Step 8. Wait for your blocks to dry and then have fun arranging them in your home ^_^

I am so pleased with how they turned out, I want to make more! My blocks came in at under $4 each, and if you already have wood stain then yours will be even cheaper! 

Do you like them? If you made your own, which words would you do? ^_^

- Lisa x

Sunday, 8 July 2012

Space Invader cross stitch brooch and Wesley Crusher's sweater inspired hat


Hey! Have you had a good weekend? Mine has been really good! Pip and I went shopping yesterday for craft supplies which was super fun, and today I finally got around to taking photos of some of my finished projects ^_^ Time for show and tell!


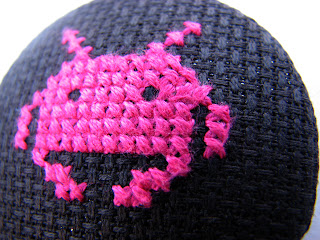
I cross-stitched this Space Invader brooch. I'm really happy with how it turned out! I used black aida cloth (which I finally found in Bunbury, of all places!) and hot pink thread. I've been really into pink lately, which is very strange because I think my last pink phase was when I was about six ~_^ I used a self-cover button to make this, and then glued a badge pin on to make it a brooch.

I've been playing around with my digital SRL (which I finally got working again) and I am in love with the super macro feature. Isn't it cool? ^_^
 

Next up, I made a beanie for the 100 Beanie Drive, taking inspiration from Wesley Crusher's awesome striped jumper (see above)! But, I think I made a bit of a mistake ... I thought the third stripe was green, but then someone told me it's actually blue >_< Urgh! Is there such thing as blue/ green colour blindness? I get those two colours mixed up constantly!

But, I think it's a pretty nice looking hat anyway, so I guess it's all ok ^_^ I made it with 100% wool, and I really hope it's soft enough!
 

I've got a couple more projects that are this close to being finished, so hopefully I'll have more photos to share with you soon!

Lisa x