Wednesday, 30 December 2015

Glittery antler flower crown


It's the middle of summer here in Australia, so I'm dreaming of cool spring evenings and lush woodland groves. Recently some friends and I were planning a crafternoon and trying to decide which project we would make. I'll show you what we decided on next week, but I couldn't resist recreating one of the other suggested projects - an adorable antlered flower crown by Georgina Doull, featured here on Mollie Makes.


Creating the antlers was definitely the trickiest part of this project; Georgina makes it look so easy, but I made and remade mine several times! I also wasn't sure if I was going to glitter them or not, so I didn't follow her instructions to press the glitter into the clay before baking. Getting the glitter onto the antlers after baking was quite difficult, so if I was to do this again, I would listen to Georgina ^____^


My headband was already covered with white ribbon, so I left it as is. I did use some baby blue ribbon that was originally from a bouquet of flowers to help attach the antlers, but it's barely visible from the front.


The flowers I used are all foam roses. I was originally planning to use some of the larger size roses, that you can see in the top corner in the photo above, but then decided they were too big and instead stuck to the medium and small sizes instead.


I cut off the wire stems with scissors and then attached all of the flowers with hot glue. There is a patch were a bit of glue leaked onto the front of the band, but when I'm wearing it the glue isn't visible.
 

The back of the band isn't as pretty as the front; I'm considering making some felt leaves to cover up the backs of the roses.


I feel like I should be waiting for some fairies to drop by for a tea party while I'm wearing this! ^____^ Despite the clay antlers, it's quite light and very comfortable to wear. I'm thinking it would also be lovely for a Christmas outfit or a casual party costume.


Considering that 2016 starts in two days (whhhaaaatttt??), this will be my last project for the year. Thanks so much for spending time with me; I hope you've had some fun and maybe even found a little crafty inspiration. As always, I love to hear from you; what you enjoyed, what you'd like to see more of, what you created this year, and what you plan to create next.

Enjoy the rest of December, and I'll see you in the new year!

- Lisa xx

Tuesday, 22 December 2015

Harry Potter book quote ornaments


I'm usually on the fence about book art; I love the look, but the thought of destroying books makes me slightly anxious. However, recently Scott and I were weeding our book collection and we discovered his old copy of Harry Potter and the Goblet of Fire. Teenage Scott was obviously pretty hard on his books, because it was falling apart. Like, literally; the back cover was gone, the binding was shot, and pages were coming out. (Don't worry - mine is still in perfect condition! ~____^)


This was apparently all the encouragement I needed to start destroying it more - and creating some new ornaments out of the leftovers!
 

These are honestly so easy to make. All you have to do is cut up the book pages into thin strips (I cut out single lines of text), push them into clear ornaments (I got mine from the craft store, and the tops come off!), and add some glitter ^____^


I still don't have my big tree up (!!!) so I did a little photo shoot with my baby tree.


I really like how they turned out! I chose lines that I thought were interesting, or funny, or just mentioned favourite characters (Fred! ; ______ ;) so it's fun to look at the ornaments and try to read the little sentences.


To all those who celebrate around this time of year, I hope you have a merry, joyous, and/or happy one! To everyone else, I hope you still get a day or two off work! ~____^

- Lisa xx

Tuesday, 15 December 2015

How to make a succulent birdcage


Hello! So, my neighbour Serene has two green thumbs and is also very generous; this works out well for me since she keeps giving me plants - especially succulents, which I love! But it was getting to the stage where I had so many succulents that I needed to work out a new way to keep them, rather than just having them in the little pots she gave them to me in. I've had a decorative metal birdcage hanging around my house for literally years, so I decided to upgrade it to a succulent cage! ^___^


Since I was planning to keep this cage inside I didn't treat the metal in anyway. If you're planning on hanging yours outside, I'd recommend coating it with a rust preventative. Also, check that the hinges are going to hold up! My cage is pretty heavy now, and I'm not sure I'd trust it hanging for a long time. 
 

I brought a hanging pot liner from the hardware store; mine was made from coconut fiber and has a circular base shape.
 

I used secateurs to trim down the edges of the liner and also cut darts into the sides so that it would fit better in my hexagon shaped cage. It was pretty tricky to cut the edges so that they were the same height all around, and mine is higher at the back. If you want the edges perfectly even, just keep trimming! I decided that having the back higher would make the plants at the back of my cage easier to see while it's on the shelf, so I left it. I'm also hoping that as the plants grow the liner will be less visible.


After adding the liner, all that's left to do is to fill the cage with soil and plants! I used a specialised cacti and succulent soil mix which, again, I got from the hardware store. The bag I got was quite large, but I've been using it for lots of my succulent replanting, so it's not going to waste ^___^


I'm not a very good plant mum as I don't know the names of all the succulents I have, but here's what I do know. The tall plant is a Sedum rubrotinctum, also known as Jelly Bean. The tips of the leaves go red when left in the sun; mine is going redder by the day which I hope means it's happy next to the lounge room window.


The three plants that look the same (two of them are next to the dinosaurs and they form a triangle within the cage) are actually all from the same plant. I think they are Sempervivum giuseppe, also known as Hen and Chicks. The pot Serene gave me had one plant in the middle of the pot and six smaller plants surrounding it; at her advice I broke off the smaller plants and planted them separately. I put three in this cage, and have the other four in pots by themselves.

The plant with wavy leaves, behind the left dinosaur, I think is an Echerevia Zorro and the plant kinda hiding behind Jelly Bean with the large rounded leaves with red tips is a Kalanchoe luciae, also called Flap Jacks. Hmmm, jelly beans and flap jacks; who knew succulents could be so delicious? ~___^

On the other side of Jelly Bean is a bushy little succulent which I think is Sedum Goldmound. I'm not sure what the brighter green plant at the bottom of the photo above is though, or the skinny ones which look like creepers.


This photo has a better view of Flap Jacks and Goldmound, and also shows how the back of the cage has the liner and plants on a higher angle. Once all your plants are in, give the soil a good watering. Some will probably drip out of the bottom of the liner at this stage, so hang it outside for a bit until it's not leaking anymore. I've been told that the best way to water succulents is to give them a little bit, and then wait until the soil is dry before watering again. This usually means that I'm watering them small amounts every couple of days, and that's not enough for the liner to drip inside. If the soil gets really really dry and your plants look like they're suffering, hang them outside again and give them another good watering.


Do you have a favourite type of succulent? Scott recently brought me an awesome doll head planter for my birthday, so now I really want a brain cactus (Mammillaria elongata cristata, for those playing at home) ~____^

- Lisa xx

Monday, 16 November 2015

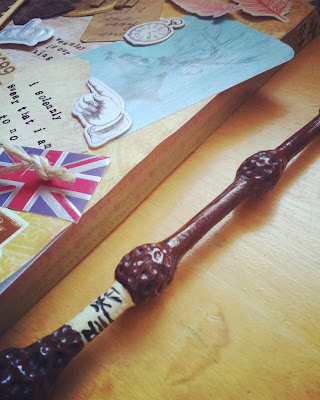
Harry Potter art canvas


Hello! This year Rebecca and I decided to give each other Halloween gifts ... and then we both promptly didn't finish them in time for actual Halloween. BUT, I have finally finished Rebecca's gift and she has received it and now I can show it to you!


Bec has always said very kind things about my art canvases (which, to be honest, seems like a term which is a bit too fancy for what I actually create, but you can see them here, here, here, and here), so I decided that she better have one of her very own. I decided on a Harry Potter theme since Bec and I are Potterheads from way back, and making this type of canvas is easier if you know lots of random little things about a fandom.


In this picture you can see a library card for Hogwarts: A History with (nerd alert!) names and approximate appropriate dates for confirmed canon Hogwarts students, a laminex heart that I made from a sample card from the hardware store, a stag cutout to represent Harry's patronus, and a whole lot of stamping done with my mini alphabet set. I really love this stamp set, and I use it so much; I didn't really try to get the letters straight on this project though because I felt like it gave a more Daily Prophet style feel.


I made a winged key simply by cutting out two vaguely wing looking shapes from scrapbooking paper and sticking them underneath a wooden key embellishment. I inked the edges of the wings and curled them up a bit to give a bit more texture.


Since woodland themes are just going out of fashion in scrapbooking now, I found a huge kit of embellishments and cutouts at the discount shop for super cheap - huzzah! The wings, blue stag card, and the stag cutout from before are all from the same kit. I stuck the wings on with double-sided sticky foam which kinda makes them look like they're floating - perfect for the wingardium leviosa spell! ^___^ I wish I had brought up on supplies a few years ago when owls were in though, because no owls were included in this particular woodland kit ; ___ ;


Other things that you can spot on this canvas include a vintage suitcases sticker from a Amy Tangerine remarks set, a silver crown and Union Jack from a Ruby Rock-It Vintedge (yup, that's how it's spelt!) Imprints sheet, two clocks and a pointing hand also from Ruby Rock-It, two chipboard letters that I coloured gold with a paint pen, kraft paper tags that I wrote and stamped on to make the Hogwarts Express luggage tags and the tag under the HP, and a random gold embellished circle gift tag that I drew a lightning bolt on. Oh, and washi tape. Always washi tape.


The most important step of making an art canvas is to mod podge everything down afterwards. Seriously, I tried to skip this step because I thought double-sided tape and glue would be enough. Spoiler alert: it's not. 

I brought a few more canvases while I was at the discount store (seriously the best place to get canvases in this city) so I may have to spread out all my supplies (again) and make a couple more! What fandom would you choose? 

- Lisa xx

Monday, 2 November 2015

Halloween 2015: Mermaid costume and spooky sweets review


Hello! So, Halloween is over for another year. I adore Halloween; I'm always so sad when it's finished! I've been told a few times this year that my hair looks like "mermaid hair", which is SUCH a lovely compliment that I decided to go as a mermaid for my costume ^____^


Rebecca and I were planning on hitting our regular rink for their Halloween skate session and then a party afterwards so I wanted something that would be comfortable enough to skate in.
 

I figured leggings and a skirt would be a practical combination and when I found this gorgeous shimmery scale fabric at Spotlight, I knew I was on the right track. I used this tutorial by Cal Patch to make my own pattern for the leggings and, aside from making them a little tighter around the knees next time, they worked out wonderfully!


I'm not yet at the stage where I feel comfortable enough wearing only leggings, so I also made a circle skirt with the same fabric. This video tutorial by Annika from The Pineneedle Collective was extremely helpful for this, but as my sewing machine was still broken at this stage, I had to get a little creative with sewing it together. I ended up doing the entire thing on my overlocker, and not hemming the skirt or adding elastic to the waistband. I'm a little worried that the waistband fabric will eventually stretch out; if that happens I'll have to reverse engineer in some elastic, but it was fine for a costume.


For the top, I printed out a picture of clamshells and used them to make a freezer paper stencil. I mixed up some light blue and light green fabric paint (I just diluted the colours I had with more white fabric paint) and used sponge brushes to add the blue on the top and green at the bottom. Then I used a brush dipped in both colours to mix them together in the middle of the shells and create a colour gradient look.


And then I put silver glitter all over them! One can never have too much glitter ^___^ Lastly, I made some hair accessories simply by attaching, with E6000, hair pin backings to some shells and starfish I had in my stash  (hoarding from childhood holidays *does* come in handy! ~___^)


The day after Halloween I hosted a crafternoon, and took the opportunity to test out some spooky recipes!


The strange pink lumps below were meant to be the Bloody Popcorn Brains by Not Quite Nigella, but mine are not quite as pin-worthy! My popcorn turned out really sticky, so making them into any real shape was seemingly impossible. I just ended up blobbing down lumps, adding some raspberry jam and calling them Blood Clots! They taste amazing though and are perfect for a special dessert treat or for curing diabetic hypoglycemia (I'd personally opt for the former!). 
 

The Spooky Worm Halloween Jello by A Spicy Perspective was voted "grossest-looking" by my guests; some wouldn't even try it due to its appearance! I'll grant that it's creepy looking, and the tapioca pearls lend an interesting texture to the jelly, but Scott, Rebecca, and I all quite liked the taste. I used lime and grape jelly and they turned out these lovely pastel colours, which went really well with the "witchetty-grub" lollies I found in the supermarket (I couldn't find plain old jelly worms like the recipe called for anywhere!). I used little ramekins as my moulds, but the jelly didn't come out cleanly. No matter, I think it looks even more gross this way ~___^
 

I'd never made chocolate bark before, and I found The Pioneer Woman's Halloween Bark tutorial very helpful even though I didn't follow her recipe completely. I melted white cooking chocolate, poured it into a tray lined with baking paper, and then pressed in salted pretzels, Star Wars character cookies, mini M&Ms, and pop-rocks. After sitting in the fridge for a while, it was ready to be broken up and served! This was the most popular dessert at the crafternoon; the salty-sweet combination was considered most superior by my friends ^____^ I personally think that the addition of the pop-rocks makes it a very appropriate Halloween treat as there is something rather creepy about your sweets making random cracking noises ...


Scott's favourite was the coffin cake; which is just a plain chocolate cake with peppermint icing. Can't beat the classics, I guess! I got the coffin-shaped pan from Spotlight and it does have a cross indentation on it, but that didn't show through very well on the finished cake, so I added my own with writing icing.


And that's it! Gosh! Did you have a fantastic Halloween? I hope you did, and that you dressed up! I love hearing about and seeing other people's costumes ^____^

- Lisa xx

Tuesday, 27 October 2015

Captain America and The Winter Soldier crochet mismatched fingerless mitts


Hello! True to my word I have been taking a short break from blogging to work on some slightly more involved projects. I've also been fitting in a lot of extra hours at work, 2-3 skating sessions a week, and a heck ton of gardening! ~___^ So here's one of the projects I've finished: mismatched Captain America and Winter Soldier fingerless mitts. Yay!


I made these for Rebecca, as it was her birthday recently, and we share all the feels about Cap and Bucky. I have seen versions of this around before, but they were all knitted and since I'm still not a very confident knitter I decided to crochet them instead.


I used Twinkie Chan's instructions for a basic mitt pattern to determine the size these should be (as this varies depending on hand size) and used a 4mm hook and some 100% DK weight wool to make them.


For the Winter Soldier mitt I crocheted in the back loops every second row to create a kind of ridged pattern to mimic the segments of his metal arm. The star was extremely frustrating to make because most applique patterns were way too big. I ended up making it up as I went along, but I'm still not totally happy with it. If I ever discover a way to make a nice small star, I'm going to steal this mitt from Rebecca and replace the star ~____^
 

For the Captain America mitt I just did a plain treble repeat and I used Handy Knitty's pattern to make the "A".


The little wings on either side of the A were a little tricky to do, because again most patterns were much too large. I ended up using a similar technique to how Handy Knitty forms their letters. I chain stitched nine, slip stitched in three, chained two, slip stitched in three, chained two, slip stitched in five. The extra chain stitches form the two lower wing protrusions, and if you're trying to imagine how it is worked up, please enjoy this extremely high-tech Paint drawing, in which the red arrows indicate the direction you are working in.

 
The two sides are made exactly the same way, and I just flipped one over once I was finished crocheting. They need to be sewed down to really look like Captain America's helmet wings, but once they are attached I think they look pretty neat.


Can you believe it's less than a week until Halloween?? I haven't done many spooky projects this year, but I will have a costume to show you which I am pretty darn happy with. What are you going as this year? Are you making your costume? ^___^

- Lisa xx