Monday, 28 October 2013

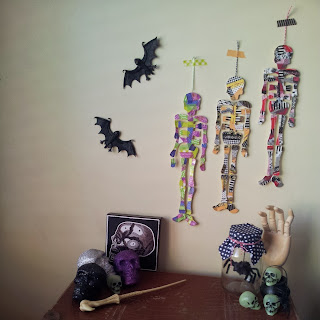
Washi taped wooden skeletons


Hello! The stores have started having Halloween decorations in stock, which I think is totally exciting, but some of them are a bit creepy. And not the good kind of creepy! ~__^


I found this wooden skeleton which one is apparently meant to give to children to paint. Would you give that to a child? I mean, look at it ...
 

*shudder*

However, I like things made of wood, and I like skeletons, so I brought three. ^__^ If you have a skeleton, or any kind of wooden shape really, you can use this tutorial to make it a more stylish kind of creepy ~__^
 

 Firstly, give it a coating of white paint. This is just to cover up the outlines, so don't worry if it's not too neat. I used spray-paint, but you could use acrylic if you have that.


Then, grab an assortment of washi tape. The only limits to your colour combinations is how much washi tape you own! ~__^ Your aim here is to create a kind of collage look; rip off small pieces of washi tape and place them haphazardly. Overlap them, lay them in different directions, just make sure you cover all the wood. I also removed the original wire joining the skeleton together to make it easier to apply the washi tape.

Once all your pieces are washi-ed, use a scapel to carefully cut off the excess. This part is very similar to the Monogram Washi Tape Brooches I made a while ago ^__^ Then give everything a coat of mod-podge, replace the wire, and add some baker's twine so that you can hang it up! ^__^


Huzzah! I made three different colour combinations; a modern green and purple, an original Halloween look of orange and black, and a classic red and black ^__^
 

I think I used about 7 different washi tapes for the purple and green one, 14 different washi tapes for the orange and black, and 8 for the red and black. Golly gosh! I don't have an addiction, I swear! ~__^

Obviously you don't need to have as much washi tapes as I do, even using three or four tapes would probably be just fine! 


Nonetheless, they're a great addition to my Halloween decorating! ^__^ (Does anyone get the impression I like skulls? ~__^)

- Lisa xx

Sunday, 20 October 2013

Geometric silk skirt from a vintage dress


Ok, so, you know how sometimes you find something in an op-shop and it's just awe-inspiring in its magnificance? Well, that's how I felt when I found this dress.


That pattern! Omg, swoon! However, the over-sized floppy sleeves, the dropped elasticated waist, and the weirdly high and straight neckline made for a dress that was, ummm, decidedly ugly.


 But, hey, it was only $8, so I brought this 100% silk vintage "beauty" home. And promptly shocked all the vintage-lovers in the world when I took a pair of shiny, sharp scissors to her. Honestly, I still feel a little guilty about that. But with a thick bit of elastic and my trusty sewing machine, I've now got an enthusiastically geometric skirt perfect for a night out!


 That helps assuage the guilt somewhat ~__^ All I did to make this was measure from the original hem to the length I wanted my new skirt to be which, in my case, was about 57cm. I overlocked the top to prevent fraying, cut my elastic to size, and sewed it into a circle. I pinned the skirt to the elastic and then just sewed the two pieces together, stretching the elastic as I went. I broke a needle doing that (*wince*) but other than that, it worked out just fine! ^__^ Since I used the original hem, I just left that alone. Yay for shortcuts! ^__^

By the way, posts like this really remind me why I'm not a fashion blogger. I made poor Rebecca take about 30 photos of me in varyingly silly poses to make this post. And in basically every second photo I was either blinking, moving too much, making a stupid face, or doing ol' crazy eyes. Sometimes all at once! ~__^ Tres awkward.
 

 But anyway, what do you think? I hope you like it! ^__^ I'll be back next week with some more Halloween inspired crafts. Yay! I just love this time of year, don't you? ^__^

- Lisa xx

Monday, 14 October 2013

Eat, drink, and be scary! Free poster printable


Hello! Today I was going to show you a skirt I made, but the sun was like, totally rude, and set before I had time to take photos. Inconsiderate, sun, very inconsiderate! ~__^ So I guess that'll be for next week, and now I'll show you the cute free poster I made for you! Huzzah!


Halloween is one of my favourite holidays, and I'm excited to start decorating, so I made this poster in three spooky colourways ^__^

I'm thinking some cute coordinating washi tape will make these prints adorable and easy wall art for this month. Yay! If you'd like a copy for yourself, just click on the pictures above to download the .pdfs ^__^

Are you totally excited about Halloween as well? ^__^

- Lisa x

Sunday, 6 October 2013

Foxy KAL - Complete!


I finished my fox hat - huzzah! Today is the last day of Tanya and my Foxy KAL (yes, I am great with deadlines, thanks for asking! ~__^) and it's been a lot of fun!


I knitted up Tanya's foxy hat pattern twice actually; the first time it was baby sized and was a gift for my new niece, but the photos I took of it were pretty poor and I wanted one for myself, so I grabbed my needles and started another! ^__^


I have a tendency to tension tightly, so I used 6mm needles instead of the 5.5mm ones recommended by Tanya. I've since learnt that I apparently knit in the back loop, which explains why my stitches have more of a basket weave look as well as why everything turns out a tiny bit too small! The more you know, hey? For my next project I will have to try knitting through the front loop, and see what difference it makes ^__^
 

Since my stitches weren't as even as they should have been, the surface knitting for the facial features didn't work as well, which I discovered when I tried to do the nose. I persevered, but I ended up having to go over my stitches a few times to cover up the white yarn underneath and it doesn't look as neat. So I just embroidered the eyes on with two strands of wool, using back stitch (which you all know is my fave! ~__^)


I used stash wool for this project, so I'm not sure of the brands, but the white yarn is 100% wool, and the grey yarn is 100% acrylic. The grey was also slightly thinner than the white yarn which meant that the top of the hat is thinner than the base. This isn't really a problem though, because heads are also kinda shaped that way ~__^
 

I used two strands of each yarn, because they weren't as thick as the yarn Tanya recommended in her pattern, and I didn't want to go and buy more since I'm still trying to stash bust and also because I have *so much yarn*! Really I just justify buying any ever again ever. I do though. But it's not just! ~__^
 

I also added a crochet scallop border because my cast on was pretty dreadful looking, and also because I like to wear my hats on the crown of my hat, which means the brims often have to be a bit lower then others may prefer.
 

I used the same grey yarn that I used for the top of the hat, but I only used one strand and a 4mm hook. I did the scallops by doing five trebles into one of the cast on spaces; then I joined the next three cast on spaces with one stitch, like you would if you were reducing with the double crochet stitch. I'm not sure what that is actually called, probably something like 'double three together'. Let's say it's that, for now. If you know the correct terminology, let me know in the comments! Anyway, I just scalloped and 'double three together'-ed all around the brim and then tied off. I think it really adds a nice touch! ^__^ 

 We had a really great turnout for this KAL - we ended up with 82 group members, which I thought was incredible! ^__^ If you want to check out all the awesome FOs this group made, head over to Ravelry and take a sticky beak ^__^


Both the knit and crochet patterns will be available to everyone on Ravelry in the next couple of days, and soon Tanya and I will begin the process of choosing the grand prize winner and also the recipients of some cute little Foxy KAL button badges (which you can spot in the photos above) - it's going to be tough because all of the hats are so good! ^__^

Millions and millions of thanks to Tanya, who was an amazing co-coordinator and who wrote a fantastic pattern! If you don't have it now, you should definitely get it when Tanya releases it on her Ravelry account! ^__^

And also shout outs to everyone who participated! You rock! ^__^

- Lisa xx