Showing posts with label sewing. Show all posts

Wednesday, 13 December 2017

Pug plushie


Hello! Oh my gosh, I've been gone from here a while! If you follow me on Instagram then you'd be pretty caught up but I've just finished my post-graduate studies and become qualified to be a librarian! I start my first ever librarian job on January 2nd 2018, but in the meantime I'm hoping to get lots of crafting and skating done ^___^

First up: this adorable little pug plushie! I found this pattern on Cut Out + Keep and thought the cute little puppies could easily be cute little pugs. The pattern is free to download, but there are no instructions included; you will have to get hold of the book "Palm Sized Softies" by Hitomi Takahashi if you need them. However, I didn't find it too difficult to complete the plushie without instructions, so maybe give it a go even if you can't get the book ^____^ I do kinda want to look at the whole book now though, since this pattern is so cute!


I used polar fleece to make my puppy, in tan and black for that pug colouration. To try and make them look more pug-like I also added black rings around the eyes and a black muzzle. For the nose I glued on a tiny piece of black pleather. Black on black is hard to see, but I think the different textures work well together.


This puppy does have a black leather collar on, but I thought they should look a bit more cheery so I also tied on a bright red bow!


I added a short piece of pipe-cleaner in the tail to try and make it curl like some pug tails do, but I don't think the tail itself was long enough as it didn't really work. It does curl upwards, just not in the corkscrew way I was aiming for.


I also think the ears turned out a bit bigger than how the ones in the original pattern picture look, which is odd because I followed the pattern exactly! Still, I think this little pug turned out pretty darn cute! 

What do you think? Pug or not? Cute or not? ~___^

I'm working on a big blanket project (ummm, when am I *not* working on a big blanket project?) but hopefully I'll be back soon with some smaller projects too! I've got something in the works for those who wear helmets (can you guess?) ^____^

- Lisa xx

Sunday, 2 July 2017

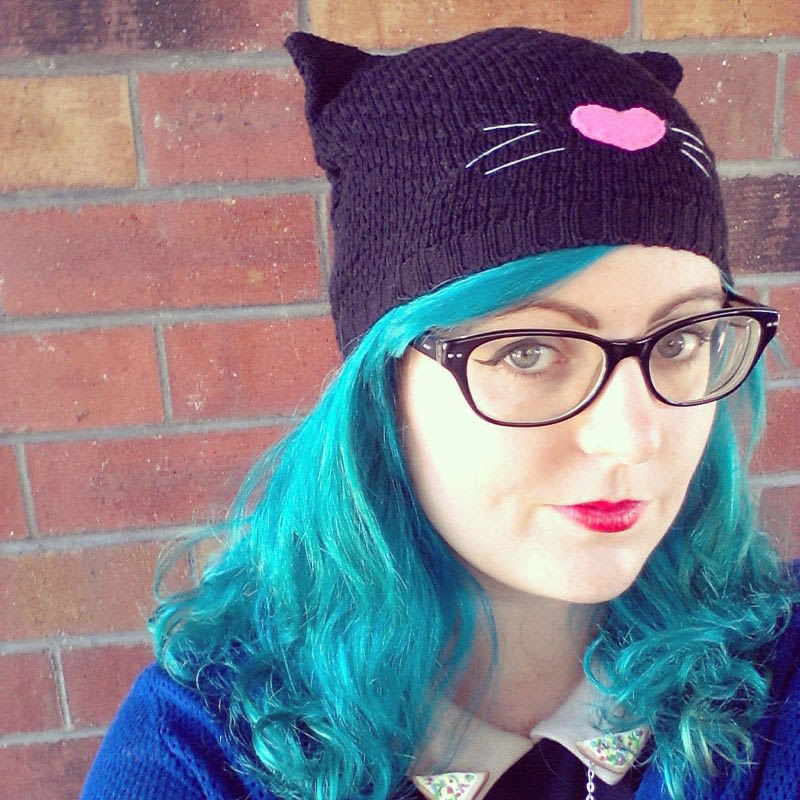
Blast from the past: No Knit Kitty Hat


I often really like looking at fancy knit stitches but I am so not good at making them. What I am good at though is thrifting! And you too can make a knit hat with absolutely no knitting skills! (Although I do still want to get better at knitting ...)


I made my hat a kitty cat hat, because why not? Mine is a black cat, but yours could be any colour ^___^
 

First step: go to the op-shop and buy yourself a sweater! It doesn't matter if it's an ugly or ill-fitting shape, but choose one that has ribbing around the edges and a nice looking stitch pattern. I used a cardigan, but a sweater is preferable because you get more fabric to work with!
 

If you're using a cardigan, fold it so that the ribbing around the neckline and the hem is matched up. If you're using a sweater, just lay it flat and ensure the ribbing around the front and back of the hem is matched up. Use a hat that you like as a template for your shape; add pins around it, plus a little extra for seam allowance.


Cut out your new hat shape!


Cut out four cat ear shapes.


Match up your cat ear shapes, making sure they are right sides together. Sew around the sides, leaving the bottom open, using blanket stitch or a sewing machine. Turn your cat ears the right way out.
 

Turn the fabric of your hat shape so that the right sides are together. Put the cat ears in the position you want them, making sure they are between the two hat pieces and pointing inwards. Add pins around the edge, leaving the bottom open, and sew together by hand (with a blanket stitch) or using a sewing machine (using a zig-zag stitch) or by using an overlocker.


Use a scrap of felt to make a heart shaped nose and add some whiskers with embroidery floss. Purrrfect!


- Lisa x

Friday, 14 April 2017

Fabric flag brooch wall display


The other day I was looking for the perfect brooch to complement my outfit. I have a huge brooch collection which I kept in a basket, but it wasn't the perfect solution because I was constantly digging through this basket to find the brooch I wanted and I was becoming worried about this causing damage to the brooches. On this particular day I decided I had had enough of the basket and that it was time to make a wall display!


This was super easy to make, so if you'd like to make one too, here's what you'll need:

- fabric
- scissors
- pins
- sewing machine/ needle and thread
- ruler/ measuring tape (or both!)
- dowel
- picture hanging kit
- thin wire (for hanging, you might get some with your kit!)
- electric drill
- wood saw (optional, but very useful!)
 

I pulled some cute pink fabric from my stash (leftovers from my Bee cosplay!), ironed it, and cut it into a rectangle. My rectangle was 70cm wide and 110cm long.


Then I measured out where I wanted the point on my flag to be. I measured to the middle of the bottom of the rectangle (i.e. 35cm from each side), measured 22cm up from the base on both sides, and then joined these marks together with a ruler.


Then I cut out the point and over-locked all the sides (except for the top because that was on the selvedge edge).
 

I used a matching thread to hem the over-locked edges.


I created a little pocket for the dowel to go through simply by folding down the top edge 5cm and sewing along the edge.


I drilled a hole in my wall and added the picture hanging kit. I cut a length of wire and wrapped it around the dowel once (at each end) and then twisted the remaining wire around itself to keep it secure. I found the wire kept slipping in towards the fabric and making the flag bunch up, so I used my saw to cut little grooves into the underside of the dowel; the wire sits in the groove and doesn't slip!


Then all I had to do was add all my pins and brooches to the flag! I love being able to see my brooches all at once and it's easy to add and remove them from the flag ^____^

- Lisa xx

Tuesday, 14 February 2017

Tassel silky scarf


Do you ever pick up a piece of fabric and it kinda just screams who it wants to belong to? This is what happened with a massive piece of silky fabric I found in my stash! I completely forgot I had it (I *really* need to tidy my craft room more often) but I found it when I was looking for inspiration for a birthday present project for my mum. And, yup, it really, really wanted to belong to her! ~___^
 

Mum's Pinterest style board is full of outfits accessorised with scarves, so I figured that was the way to go!
 

Since the fabric is very light and drapey, I made a rather thick scarf; it's 15cm wide and about 160cm long. I thought a plain rectangle scarf would be a bit boring so I cut the ends at a diagonal and added lots of colourful tassels!
 

I cut two identical pieces of fabric and sewed them right sides together, leaving a gap for turning. Then I turned the scarf right way out, sewed on the tassels, and top stitched around the edges. This had the advantage of closing the turning hole and giving the scarf a little more structure. I top stitched in yellow which works with the colour scheme and is a little more interesting than white.
 

I made the tassels with embroidery thread that matched the colours in the fabric. They are very easy to make, albeit time consuming! I got through quite a few episodes of Miss Fisher's Murder Mysteries while make this project ~___^
  

I did end up making too many tassels however, and I have a lot of this fabric leftover still ... perhaps a matching jacket is called for?

- Lisa xx

Saturday, 28 January 2017

Softies for Mirabel


In 2016, my crafting group and I decided to dedicate a couple of sessions to making Ninni monsters to donate to the Softies for Mirabel handmade toy drive. To make our crafting more streamlined and efficient, we made Ninni/ RevoluzZzionary Monsters - it's an easy free pattern and is also super cute!


I printed out the pattern for the monsters onto both A4 and A3 pieces of paper so we have some big monsters and some little ones. The Ninni monsters have tiny little ears and arms which can be a bit tricky to stuff so having them printed a bit larger made that step easier.
 

A few members in the craft group were looking to reduce their fabric stash, so we ended up with an eclectic mix of fabrics! The good thing is because this pattern is so simple to make it works with basically all fabric types; we used up cotton, denim, and knits. I think a satin Ninni monster would also be pretty awesome! ~___^


The eyes, hearts, and little teeth are all felt and, along with the mouths, were sewn on with a combination of machine and hand stitching. 
 

We made the monsters in a kind of construction line process; we had some people cutting out bodies, some cutting out the facial features, a couple of people sewing the seams on machines, some people stuffing, some people hand stitching up the turning/stuffing holes ... Both days were a lot of fun and I think we did pretty well with how many monsters we were able to create.
 

In total we ended up with 29 Ninni monsters! (One of which is not in the photo below because I wanted my rows to be even ~___^) Each Ninni monster is slightly different and so has a little spark of personality shining through. We hope the children they go to love them!


If you'd like to make a toy to donate to Softies for Mirabel, you've still got time! If you are able to, it's a wonderful cause ^___^

- Lisa xx

Tuesday, 9 August 2016

Jake the Dog Plastic Bag Holder


Hello! Do you feel like practical things are made so much better with just a touch of impracticality? Like, I have a rice spoon. Boring. I have a rice spoon that is a pastel pink rabbit and its ears are the spoon scoop - excellent!! I decided recently that I really needed a plastic bag holder - and that it should totally look like Jake the Dog.


My Jake has a 65cm long torso and, including his arms and legs, is about 118cm long in total. He is only 14cm wide though; I can't decide if I like the skinny look best (because it kind of looks like he really has stretched) or if I should have made him wider.


To make Jake, I started off by cutting two wide strips of yellow fabric (15cm wide and 70cm long), six skinny strips (5cm wide and 35cm long), and two really long skinny pieces (5cm wide and 72cm long).


Then I used a plate to round off both ends of the wide strips of fabric; this will be Jake's head and bottom.


In one of the wide strips, I cut two holes with a 10cm diameter. I didn't want to make a traditional plastic bag holder where the bags go in and out the top and bottom because I thought it would make Jake look a bit weird. This solution, to be honest, also looks a bit weird! So I guess it's up to you which weird you like best ~___^


I sewed two skinny strips in half and threaded them with about 27cm of elastic.
 

I folded up the raw ends and sewed them closed, which prevents the elastic from moving around and makes the next step slightly easier.
 

I pinned the elasticated strips in place around the holes and sewed the raw edges together. 
 

The result are these strange scrunchie looking openings. I think I could have made the elasticated strips wider, but these openings work well enough as is.
 

The next step was to make Jake's facial features. To make the ears I drew a square 5cm by 7cm and then curved off one of the short sides. I cut four of them, sewed them into pairs, and lightly stuffed them. I also made a tail, 4cm wide at the base and 1cm at the tip and 7cm long, which I sewed and stuffed the same way as the ears.


 Jake's eyes have two pieces each; the black circles are 3cm diameter and the white circles are 2.5cm. His nose is 1.5cm in diameter and his mouth is the same size, but cut in half to make a semi-circle. His eyes, nose, and mouth are all felt. To make the puffy thing that his nose sits on, I drew a circle eight cm in diameter and then turned it into a shallow horse-shoe shape. I cut out two pieces, seamed the raw edges leaving a small gap, turned it right way round, and stuffed it with polyfill. I sewed all of the facial pieces on by hand.


For the legs I used the four leftover skinny pieces; I just rounded off the ends, sewed them together, and turned them right way round to stuff them. I stuffed them pretty firmly, but left a large gap at the top to make them easier to sew to Jake's body.
 

The arms are made from the really long skinny pieces of fabric. There is no need to round the edges because both ends are sewn into Jake's torso, but otherwise they are made the same way. I didn't take a photo of the next step (d'oh!) but all that is left to do is to pin the ears, arms, legs, and tail onto the torso and sew the torso together; you don't need to leave a gap because you can use the holes for the plastic bags as turning holes! Then you can turn Jake the right way around and - ta da!


Jake the Dog Plastic Bag Holder!


He managed to fit in our entire plastic bag hoard, and he really brightens up the laundry room, so I'm very glad I've made him!
 

- Lisa xx