Showing posts with label jewellery. Show all posts

Monday, 28 September 2015

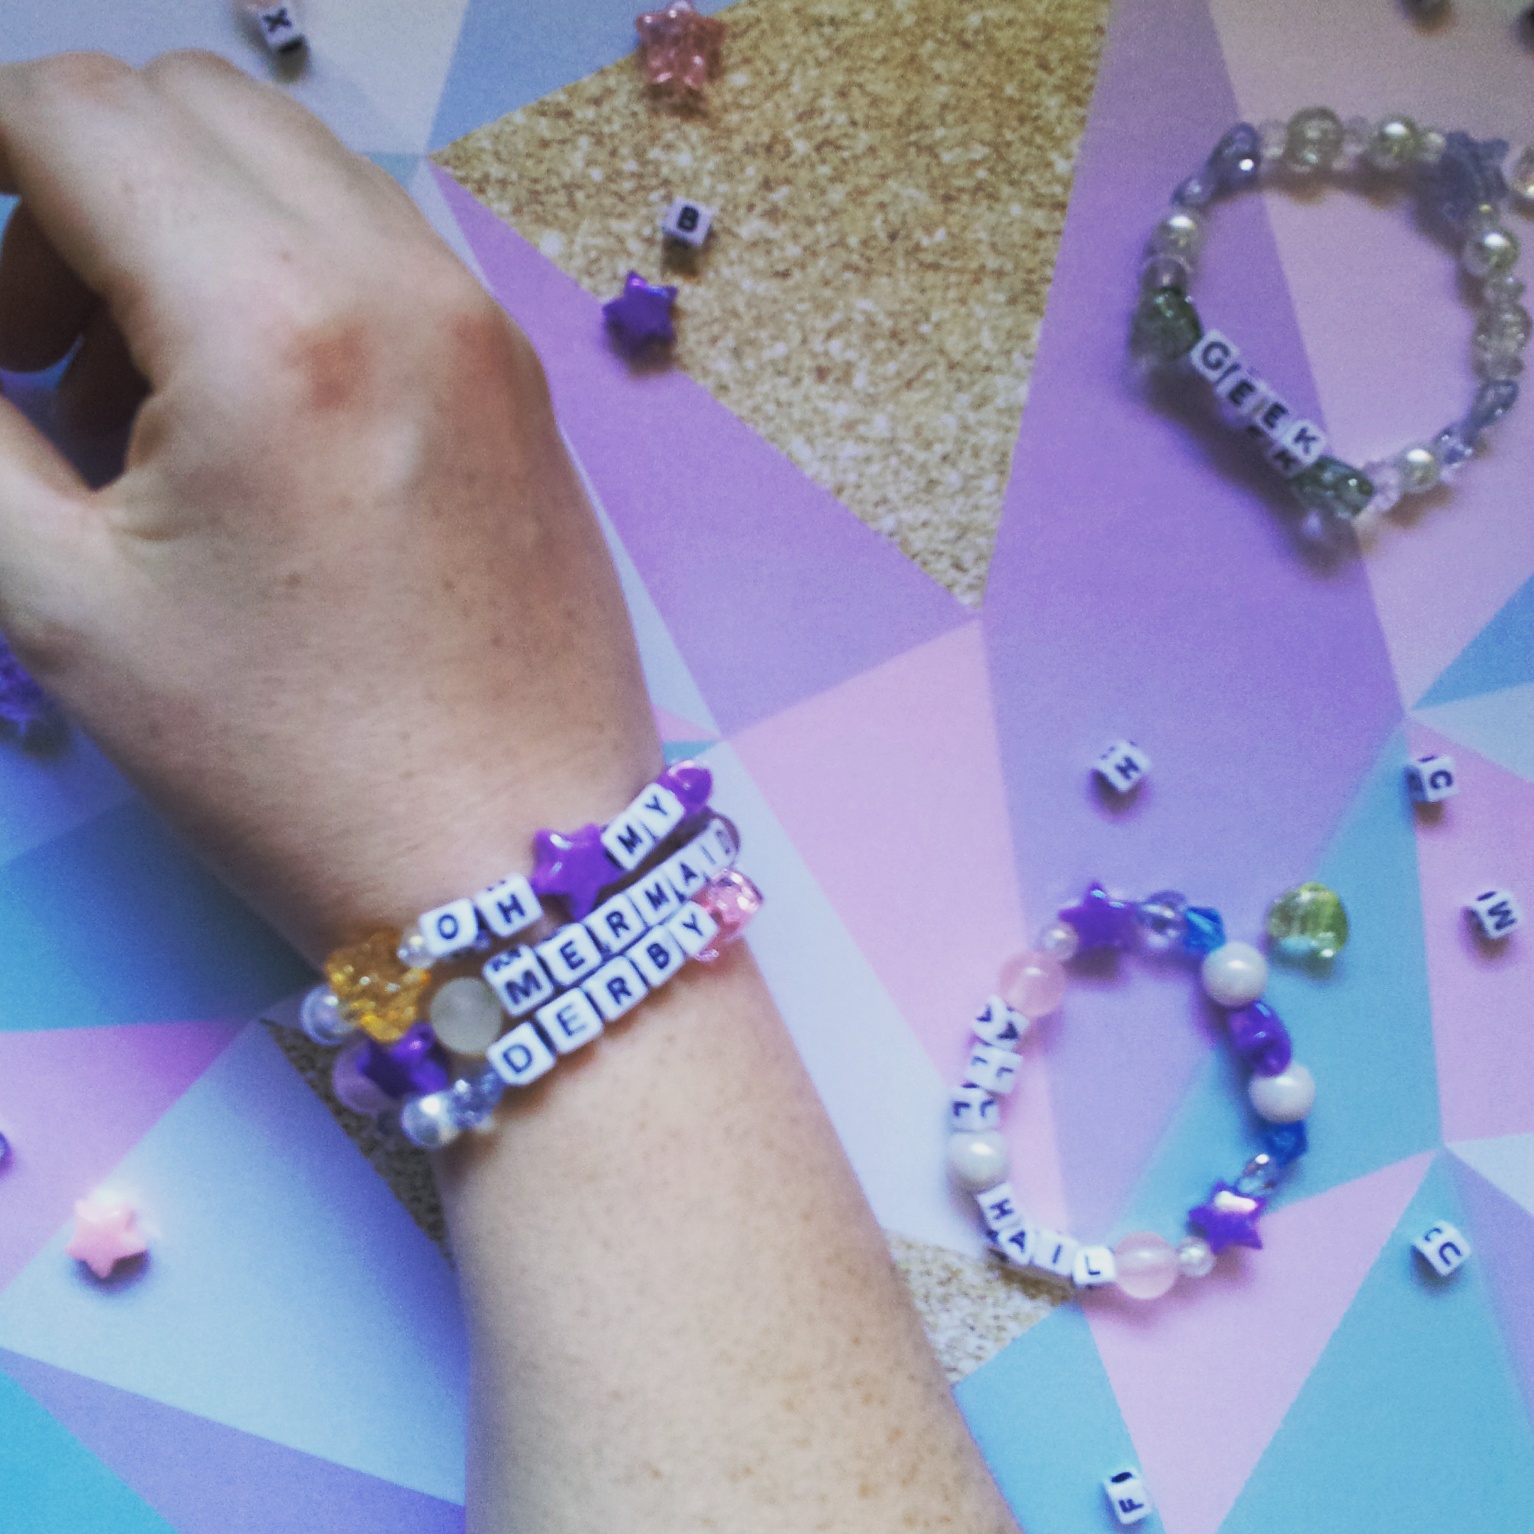
Pastel alphabet bead bracelets


Hello! The other day I was going through my beading stash and I found some glittery heart and star beads and some alphabet beads in a little kit which I am 90% sure I've had since I was a child. I didn't actually have enough alphabet beads to make many words or phrases, but I made one bracelet, decided I needed to make more, and went out and brought more alphabet beads. What I've learnt: there are never enough "e"s.
 

Nonetheless, I made quite a few little bracelets and I'm quite pleased with how they turned out.

 
In my stash I also found some cute plastic heart beads with small shiny gems in them, faux pearls, and some random coloured plastic beads. I used stretch elastic for threading the beads onto, and found it a complete and utter pain to work with. There was one bracelet in particular that broke four times! I've found the best way to preserve your bracelets, and your sanity, is to do two double knots, and then coat the knots in glue; I used E6000 and found it worked well. The other tip is to roll your bracelets on, rather than stretch them out too much.


I made five bracelets in what I think of as the pastel colourway, and then decided to try out some black alphabet beads and make some Halloween jewellery ^___^


When making these, I found that cutting the elastic to ten inches, and then beading to cover six inches was a good way to get enough bracelet to go around my wrist and enough ends to make tying the knots not totally painful. If you have more dexterous fingers than me though, you may be able to get away with shorter ends.
 

Lastly, I mixed together the black and pastel beads to make myself a "muggleborn" bracelet. I don't know if I have a favourite out of these bracelets ... but this one is definitely up near the top!
 

Although I love making quick projects like these, I've found lately that I haven't been making many big projects. I think this is partially because I've been trying to post a new project every week, so I've decided to relax my posting schedule. I'll still be posting, but only when I've finished a project. Hopefully this will actually make for more interesting, involved projects, and more tutorials too! And, of course, if you feel like you're just not hearing enough from me, feel free to check out my Instagram ~___^

- Lisa xx 

Wednesday, 19 August 2015

Three Addams Family crafts


Hello! Do you like the Addams Family? I really hope you said yes, because today I've got three easy and quick crafts inspired by our favourite creepy family to show you! I didn't watch heaps of TV or movies growing up, but the Addams Family is one that definitely sticks out in my mind; I wanted to be a cross between Morticia and Wednesday when I grew up, and spent a good portion of my teenage years dressing entirely in black to achieve such a look ~___^


This first project is one that I have been meaning to do for ages! I don't know why I put it off for so long as it wasn't difficult to do and I really love how it turned out ^___^ I prefer having black pillowcases since otherwise they do tend to end up stained by my hair dye, but if you wanted to make your own you could really use any colour. I do feel like black is apropos though!


To make them, I ironed the pillowcases to get most of the wrinkles out and wrote out "mon cher" and "cara mia" onto them with white chalk.


Then I used a paintbrush to go over the letters with white fabric paint. I did about three layers of paint to try and get the lines a relatively even weight; they're still not perfect but the extra layers also helped the white letters pop more against the black fabric.


I left them to dry overnight and then gave them a quick iron, with a cloth over the letters to protect my iron. Depending on what type of fabric paint you use, you may not need to iron your project but it makes me feel a bit more confident that it will survive the wash!


I think these would be perfect for a housewarming gift for a couple, or maybe even a wedding present! Depends how kooky they are, I guess ~___^


Next up is the craft that inspired this whole post: a Morticia quote canvas. This is seriously the easiest craft ever!


I was feeling a bit uninspired one day so I was digging around in my craft room and came out with a blank square canvas and some black glittery letter stickers. I decided that there really isn't any other colour best suited to black than more black, so I painted the canvas with a mixture of black paint and glitter mod-podge. I slopped it on nice and thick to give it some texture and then when it had dried, I just glued on the letter stickers.


I know gluing stickers may seem a bit strange, but they're made for attaching to paper and so weren't sticking as well as I wanted them to. I've put this canvas in our lounge room, and when the sun hits it it really does sparkle! Which is great because, after all, black *is* such a happy colour! ^___^


My last project was going to be something different to this family motto necklace, but I had a total craft fail and couldn't rescue it in time! I'm sure it's still salvageable, but it's going to take a bit longer than I had hoped.


So, instead, I got out the sculpey and whipped up this necklace. I used the same technique as the derby name necklace I made for Electra Fire, but made it bigger as the Addams' Family have got quite a long creed! In case you can't read it, the motto is "Sic Gorgiamus Allos Subjectatos Nunc" or, "We Gladly Feast on Those Who Would Subdue Us".


I made the pendant from black clay, stamped it with my tiny alphabet stamps, added holes with a thick needle, and baked it for 20 minutes at about 150oC. I wanted a tarnished metal look, so when the pendant was done baking, I covered it with silver acrylic paint and, while it was still damp, rubbed at it with a tissue to show some of the blackness underneath.


I used a fine felt tip pen to add some black in the indentations of the words and then I added the chain by threading jump rings through the holes. And that's it! A pretty necklace, but not just pretty words ~___^


Until next time, do do do do *snap snap*

- Lisa xx

Tuesday, 14 July 2015

Brooches, leather stamping, and glass painting


Hello! I wasn't sure what to show you today, as I haven't finished any new projects this week. However, I do have some little projects that I haven't shown you before so now I figured you could see all of them! ^____^


 I made this brooch for my friend Clare as a "leaving Perth" gift. I designed the image using Illustrator, printed it out, glued it to balsa wood, cut it out, coated it with mod podge, and attached a badge backing. Unfortunately, since I'm such a procrastinator, I didn't have time to take any photos of it before getting to the pub and giving it to Clare!


Luckily, she didn't mind me stealing it back for a few quick snaps ~____^ The tiny banner says "home is where the heart is", but Scott said I should have made it say "they can break a man's arm you know!" (you'll have to watch Hot Fuzz for that reference!) The brooch image is of a black swan on the Swan River (yup, that's what we called it! Clever and original, huh?), in front of the Perth skyline. I drive around and over the river on my way to work and the city, and I always love seeing the swans. I hope they will remind Clare of some fond Perth memories while she makes her new life in Melbourne ^___^


I used basically the same technique to make myself this Glow Cloud brooch. I used scrapbooking paper for the background, and a pen to write on the letters, and then mod podged it onto the balsa wood. I also coloured in the edges of the brooch with a black sharpie, which I really like the look of.
 

I made these little key ring charms for my brothers using leather, metal stamps (courtesy of Bek who knits), a black felt-tip pen, rivets (courtesy of Bec), and some large jump ring type things. As you can see, the red leather has more texture which made the stamping a little less visible; the black pen helps with that a bit, but overall the green leather worked out the best. I haven't actually given Brett his gift yet, but he doesn't read my blog so I think we're safe ~____^ Craig liked his, which was a pleasant surprise as they don't often appreciate handmade gifts.


I also made a key ring charm for Scott; this one is done on black leather but the stamping actually showed up quite well! Perhaps by this time I was actually using enough pressure when hitting the stamps ~____^


Emma from A Beautiful Mess painted some gorgeous cactus bottles, and I decided I simply had to give it a go myself! I don't have many colours of glass paint, but I had the primary colours so I mixed up some green and got painting. I've been using them as water bottles, which I think is much nicer looking than constantly reusing old plastic bottles. When I'm not using them, they also make a pretty little garden on my kitchen windowsill ^___^


And since I had my paints out, I decided to decorate the jars I use for making chia puddings and overnight oats in. I did some gems and an ice-cream cone, but my favourite is Space Kitty! They certainly brighten up my mornings ^____^

I've got skating tonight, and I'm sincerely hoping it's not as cold as last week - we were all breathing out fog and steam actually came off our limbs when we took off our knee and elbow guards! Brrr - think warm thoughts for me, please!

- Lisa xx

Tuesday, 7 July 2015

Derby Name necklace


Hello! My roller derby league (WARD, for those of you following along at home!) recently had this year's grand final - and it was totally awesome! Watching the bouting skaters do their thing is always incredible and inspiring, but it was also fantastic because I got to hang out with my derby friends and celebrate fellow freshie Electra Fire's birthday - huzzah!


I wanted to make her a little gift so I pulled out some sculpey, mini alphabet stamps, and gold paint and whipped up a little name plate necklace ^___^


You could use any colour sculpey to make this necklace, but I decided on black. After conditioning the clay, I rolled it out using a small glass bottle as a rolling pin and then used my scalpel to cut it into shape. I used a pin to add the holes at the top and stamped on Electra's name with my mini stamps.


I baked the sculpey for about 15 minutes and then let it cool. Then I put a small amount of gold paint onto my finger and rubbed it across the clay. I used a tissue to rub off the excess, leaving only the gold paint in the letter indents.


To finish it off I threaded some large jump-rings through the name plate, and then strung it all onto a gold chain.


Electra liked her necklace - which was a huge relief to me! It was really simple to make, but I like the impact of the simplistic design. I think I will make one for myself as well - but I haven't yet decided if I want red clay and gold paint or pink clay and silver paint ^____^

I'm still working on my larger version of the pink and blue heart hat, but for some reason I just can't get the ribbing to work this time! It's so frustrating because I'm not sure what I'm doing wrong. I think I will have to wait until I can get some clever knitter friends to check it out. So next week's post will be a surprise for both of us! ^___^

- Lisa xx


Tuesday, 2 June 2015

Welcome to Night Vale posters, art canvas, and earrings


Hello! Recently I did a Welcome to Night Vale swap on Craftster and since my swap partner has received her parcel, I can share with you what I made! ^___^ If you haven't listened to the Welcome to Night Vale podcast yet, I highly recommend you do! It's really fantastic, and this post will make a lot more sense if you do.


The thing I'm most proud of is this WTNV themed art canvas. Whenever I start an art canvas I think that I have nothing to put on it, but after digging through my stash I usually manage to find more than enough - it's a great way to use up random bits of stuff I've been hoarding too! ~___^


I used a Kaisercraft wooden cloud cut-out covered in glow-in-the-dark paint for the Glow Cloud (all hail ....).


The musical notes (i.e. the weather) are also wooden cut-outs, but these ones are from Typo. I drew the Night Vale eye on the white one with a felt-tip pen.


I used "thickers" (still can't get over that name) to write out Night Vale, and the quote below is written in felt-tip pen also.
 

I'm not exactly sure where I got this plastic cactus from, but I figured it was perfect for representing this friendly desert community. I cut off the bottom stand with scissors and attached it with E6000 glue.
 

My swap partner said that one of her favourite characters was Fey, so I used stickers to add the numbers Fey read aloud down the side of the canvas.


This side of the canvas is kinda Carlos the Scientist themed; he discovered that the clocks in Night Vale aren't real, and I headcanon him as wearing thick glasses so I used clock patterned pattern and glasses washi tape for this part. The pocket watch is a jewellery component that I brought at Spotlight and then discovered is faulty - the glass face is meant to be removable, but mine didn't budge! I used my trusty felt-tip pen and some white card to add Carlos' discovery to the inside of the pocket watch and I attached it to the canvas with string, a small piece of leather, and a lot of E6000.


There is also an instruction from a local community group; they huddle in the hole in the vacant lot behind the Ralph's, if you're interested in that sort of thing.
 

The top of the canvas has more wooden cut-outs from Typo, these ones spelling out the end of a rather popular Night Vale quote: "If you see something; say nothing, and drink to forget." I don't condone this behaviour (you shouldn't be seeing anything in the first place) but I did have these wine glass cut-outs and I couldn't think of a single other thing they'd be useful for.


The bottom of the canvas has another one of Fey's numbers, Khoshekh the floating cat, and a warning against rabbits.
 

The other side of the canvas expands on the rabbit warning: they are not what they seem. These ones seem like even more wooden cut-outs.


I even added a little something on the back of the canvas. Strex is seriously creepy, so I think this is the best place for them.


All the papers I used were from mini scrap booking paper pads that I brought from Spotlight. They are really fantastic for canvases of this size as you don't get nearly as much paper scraps leftover.


I also made two paintings; they are just acrylic paint on card stock, but I think they would look quite good framed. I left them as is to mail, however, since postage costs are already high enough without adding more weight to the parcels.
 

I really liked how the galaxy effect turned out, although I think it could have possibly been a bit darker. Basically I watered down my acyclic paint so that it worked more like watercolours and added purple, blue, and black all over the page in random splotches. After it was dry, I added the words, the black edges, and the silver stars. I might make another for myself so I can play around with this technique a bit more.


It's difficult to see, but I also added some very watered down iridescent medium to the black edges of the page; it gives it a subtle sparkle that looks really pretty in real life.
 

This art piece was made using the same technique as my Princess Leia and Han Solo quotes where I just used masking fluid to write out the quote, painted over it with watered down acrylic, and then removed the masking fluid once everything was dry. I went around the words with a felt-tip pen again; I think it looks more impactful that way.


Lastly, I made these Big Rico's Pizza earrings; these were super simple to make as all I had to do was glue earring backs to the pizza charms I had already made.
 

I made the 'packaging' (I use the term loosely) with more scrap booking paper, mini stamps, and some pens. My drawing skills aren't top notch, but hopefully my Hooded Figure is a little spooky looking?


In return I received this wire crochet Hiram McDaniels sculpture;
 

 A wood-burned quote block, Glow Cloud card, and stickers;


And a tiny Glow Cloud scarf with a wooden-burned scarf ring.

Have you ever done a craft swap before? This is the first time I've swapped with someone I don't know, and I must say swapping with friends is a lot less stressful! 

I'm currently working on something just for me, which is even less stressful ~____^ I'm trying to improve my knitting skills so I'm making a hat with ribbing and colourwork - two techniques that I haven't tried before. It's going pretty well but my hands aren't used to knitting and are so sore! Luckily tonight is roller derby training so tomorrow my legs will be sore which will take my mind off my hands ~____^

- Lisa xx