Monday, 20 February 2012

One Day Bow Belt!

Hey! Posting on a Monday - weird! I normally don't post because of work (boo!) but I was SUPER PRODUCTIVE today making a *really easy* crochet bow belt. 

I made this by crocheting on public transport to and from work, for a little bit during my lunch break, and a bit more when I got home. So, if you do this on a day that you *don't* have work, I bet you could make this super fast!


 It's hard to take a flattering photo of one's own middle ... anyway, you can see how this works; it's a skinny belt with a big bow designed to brighten up simple outfits and look super pretty ^_^

Here's how you make it!

Belt 
 Make a slip knot and then crochet five chains, or however wide you want your belt to be. Chain another two, treble into the fifth chain.
Treble into each chain stitch.
<Chain two, turn your work, make five trebles into each stitch along the row>
Repeat <...> until the belt is long enough to encircle your waist.

Now you want to extend the belt a bit more so you have an overlap of the two ends; you will sew your bow in the centre of this overlap, and put fastenings on either side of the bow (check the picture below to see how the belt overlaps).

To make a button hole, skip one treble stitch and chain two instead. Then treble along the row as per normal.


Bow
Chain 30 (or as long as you want your bow to be), then chain another two and treble into the 30th stitch.
Treble along the row, chain two, turn your work, and treble across again.
Repeat for nine rows.

Fold the resulting rectangle into a bow shape. Thread a large needle with a long length of wool and make a stitch to hold the bow into place. Then wrap the wool around the centre of the bow to hide the stitch. Once you're satisfied with how it looks, sew the bow onto the belt, in the centre of the overlapping section.

Finishing up
Sew a button onto the belt so that it is opposite to the button hole. Add a snap onto the other side of the overlapping section. Weave in all the ends.


And it's finished! Huzzah! Put it on and force everyone in the vicinity to admire your skills ~_^

I really hope you like this project, and if you make one, I'd love to see it!

Lisa x

Friday, 10 February 2012

Crochet and Spool knitted Princess Leia Hat!

Oh my gosh - I finally finished this hat! Squee; I am so happy! This is actually a really simple hat, but the spool knitting simply took ages >_< I really love it though, it's really comfortable and because the wool I used is 100% Baby Alpaca it is so soft ^_^


I used the thickest brown wool I could find (Vera Moda Husky), which helpfully didn't have a ply on the label. I crocheted the hat with a 6mm hook though, so based on that, I'm estimating around 12 ply. The base hat is made up of trebles; if you're looking for a simple pattern, try this Pokeball Hat - obviously just ignore the colour changes ^_^ Then I made a big spool knitter using a wrapping paper tube and four skewers; I cut the tube down to about six inches and then taped the skewers evenly around the tube, leaving them sticking up about an inch above the top of the tube.


And then I spool knitted. A lot. I spool knitting 202 inches for each bun, which used up just under 100 grams per bun.
Then I coiled the spool knitting tubes into the buns; they have a diameter of about 5 inches and are about 2 inches high. Sewing them together was a bit tricky! Possibly using hot glue would have been better, but I was concerned it might be seen and hot glue also does make things a little less soft.

Anyway, once they were sewn into a bun-shaped, I sewed them onto the sides of the hat.
 
And now it's done! Yay! ^_^ I am so happy that I finally finished it!
See you later - with all the backed up pictures for the drawing challenge!

- Lisa x

Sunday, 29 January 2012

Mini Yarn Wreath Brooches


Hello! This weekend I made mini yarn wreath brooches! Aren't they cute? ^_^


I made one for Valentine's Day ...


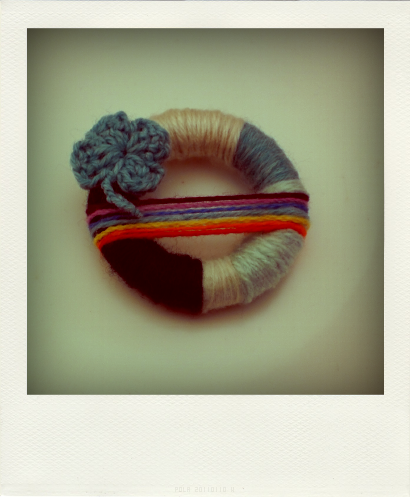
... one for St Patrick's Day ...


... one because I'm a giant Harry Potter nerd ...


... and one because this colour combination is slowly taking over my life ~_^


I was going to make a little tutorial, but the camera ate half of my pictures so it is now a teeny-tiny tutorial with some bits you just have to imagine ~_^ If my camera does decide to work properly again soon, I will add in the other pictures, but until then, on with the show!


Mini Yarn Wreath Brooches


Step 1: Get hold of some curtain rings. I went to an op-shop and got a bag of them for $3; they are wooden and about 6.5 cm wide on the outside and 4.2 cm wide on the inside ring.  


Step 2: Gather your yarn. This project is great for using up scraps!


Step 3: Put a bit of hot glue on the back of your ring and then place the end of your yarn into the glue. 


Step 4: Wrap your yarn around the ring. When you want to change colours, use a bit of hot glue to stick down the end of your current colour and then repeat Step 3 to start the new colour. Wrap until the entire ring is covered in yarn.


Step 5: Make your embellishments. For this wreath I made some tiny yarn balls by wrapping yarn around even tinier balls of paper and some tiny crochet hooks using thin wire.

For the wreaths pictured above, I crocheted hearts, a four-leaf clover, and a tiny bow. I also made an arrow with a skewer and some felt, and some felt glasses which are glued onto thin wire to keep them from sagging.


Step 6: Hot glue your embellishments into place. I made three tiny yarn balls and I added two crochet hooks, because just one looked unbalanced. 

Step 7: Add a badge back with more hot glue. 


Step 8: Put it on and insist everyone admire it; it's finished! ^_^


Yay! If you make one, I'd love to see it! ^_^

Have an awesome weekend!

- Lisa x

Saturday, 21 January 2012

Star Wars Valentine Card

Hi! How are you today? I had a great day ^_^ I had nothing planned so I spent my day knitting and reading Ranger's Apprentice - not at the same time, though, I haven't yet mastered that skill ^_^ 

Also, I made this Star Wars Valentine Card! I know there is still quite a while to go before February, but it never hurts to be prepared, right? ^_^


I've printed some out on white card, which looks really good, but I am planning on getting some coloured card as well to print on which I think will really make the graphic design pop! ^_^

Happy (very advanced!) Valentines Day!

- Lisa x

Wednesday, 18 January 2012

Spool knitted beehive


Hello! Do you ever get an idea to make something and then you just *have* to make it, and *right now* if at all possible?

That's what happened to me with this tiny beehive.

I was a bit like "ooh, but I should be doing things on my list!" but I figure it's a bit like chocolate. If you *really, really, really* want a bit of chocolate, but keep saying no, no, no, eventually you will want chocolate so much that you might just explode. Or eat two really large blocks instead of the couple of squares that could have sufficed in the first place. Hmm, I'm not sure how this worked as a metaphor for crafting. Anyway, moving on, I made a beehive!


I think it is quite cute, even if it does have a touch of the primary school fete around it. Hey, what am I saying? I *love* school fetes! ~_^ 

It was very easy to make; I made a long tube with my spool-knitter, used hot glue to position it in a kinda hive-like shape (you could probably sew as well, but I wanted this to be NINJA QUICK), and then got out the hot glue again to add the little felt door and, of course, some bees.
I made the bees buy cutting out an oval shaped piece of mustard coloured felt, then adding stripes with black felt, and wings with white.


This beehive is about seven cm tall and it is hollow in the inside. I think it would make a perfect cover for a hard-boiled egg, only Scott and I don't eat hard-boiled eggs and don't even own an egg-cup so I couldn't even fake a photo!

Maybe it can be a couture hat for one of my Blythe dolls (though, due to the large size of their heads, it would probably look more like a fascinater)?

What do you think it could/ should be?

I hope you have a great day!

- Lisa x

Monday, 16 January 2012

Going somewhere, Solo?

Hello, everyone! Today is Scott's and my wedding anniversary - we've been married for two years, and together for seven and a half! Wowzers ^_^

As you probably know by now, Scott is a BIG fan of Star Wars, and I have a whole mess of wee little stitches patterns which are too wonderful to *not* stitch up, so I made Scott this Han Solo cross-stitch ^_^


It was pretty quick to stitch up, I worked on it over a couple of days, but if you had enough dedication, I bet you could whip this out in a day. I can highly recommend wee little stitches - the pattern for Han Solo was really easy to follow and they provide a handy thread colour guide too! Han Solo is from the Star Wars - A New Hope pattern and the letters were stitched without a pattern (which was a terrible idea and involved lots of unpicking, and I will never, ever do it again >_<).

Anyway, it turned out well, it fit the frame wonderfully, and Scott really likes it! Yay!
So now, I need more ideas of Star Wars crafts to make for Scott; any suggestions?

- Lisa x

Sunday, 15 January 2012

Thrifted china

Hello! Yesterday I drove down to my home town to see my parents, my Pop, and to go to the markets ^_^ I had a really great day! And I have some lovely new china to share with you ^_^


This teacup and matching plate and saucer are decorated with lily of the valley and doesn't match at all with ...

... these very '70s flowers. I love them both though! ^_^
 

I didn't yet have a little milk jug, so I'm really pleased with this one! Also, I love the green ^_^
 

And these three rose dishes will be perfect for serving sweet treats at my next tea party ^_^

I hope you had a nice weekend too!
- Lisa x