Showing posts with label cake. Show all posts

Monday, 25 January 2016

Baking, succulents, and parties


Hello! I realised recently that I have an awful lot of photos of little things I have made/ baked, but I haven't shared them with you! You may have seen some of these on Instagram, but here we can talk about them a little more without having to make those huuugggeeee comments that end up looking like a really dense wall of text ~___^

First up: ugly cake! Scott and I recently celebrated our sixth wedding anniversary for which the traditional gift is salt. I thought that sounded a little boring so instead I decided to make a salted caramel cake. I wanted to make a layered cake, but I also didn't want it to be huge so I made a rectangle shaped upside down cake, and cut it into smaller circles. The caramel part of the upside down cake means that I didn't have to put anything between the layers.


However, cutting nice looking circles from cake is actually a lot harder than I expected it to be! When I layered them up, I realised how wonky my cake was! >___<


I thought about covering the entire thing in buttercream icing to try and make it look nicer, but ultimately decided that salted caramel layers and a salted caramel sauce poured over the entire thing was probably enough forms of sugar for one small cake so I left it naked and ugly ~___^ We ate it anyway, and it tasted pretty good!

I also made a simple card for Scott. I used a black and white chevron paper to cover a blank card, glued on a square of gold heart patterned paper, and stuck a black and gold embellishment in the middle. I messily scribbled a border around the heart paper with my silver metallic pen and it was done!


Bunnings had a heap of tiny succulents for sale recently, so I brought, ummm, way too many of them. I put one in a tiny teacup to give to a friend for her housewarming, and put two more in two empty tins I kept because they're cute. I added dinosaurs because dinosaurs are awesome.


I put the rest in a bigger pot, and added more dinosaurs and some pretty little rocks. I'm not sure how well that one in the middle is going; I brought it because I thought it was a cool colour, but I'm now thinking that perhaps I brought a dying succulent. Hmm.

I designed a badge to give to some of my derby pals, and recently two of my buddies from skating star classes had their birthday so I used two of the leftover pins to decorate some hair bows. The fabric I used is the same design as the badges, which I got printed from my Spoonflower store.

For my birthday I had an Adventure Time themed party - I didn't take many photos but I did remember to photograph some of the food (the most important part, right! ~___^)

I made Lumpy Space Crackles with using this recipe ... except I didn't put in any cocoa and I used honey instead of maple syrup. I also added some blue and red food colouring which didn't mix in that well. I was hoping for it to make purple, but it mostly didn't. I also put on some star shaped sprinkles to make them more space like ^___^


I brought some Adventure Time cookies, but they didn't taste that great so I made them into chocolate bark, with the addition of salted pretzels and pop rocks. They were a big hit!

I also made a Tree Trunks apple pie; the fancy lattice top was trickier to make then I expected it to be! It tasted really great and even though it was huge, it got demolished really quickly.

These sunglasses were made for my friend Clare for Christmas. Clare has an adorable style and is a big fan of daisies, so I wanted to make her something to suit her look.


All I did to make these was glue little daisy cabochons around the frame of some round sunglasses. It was really easy, but they turned out really cute!

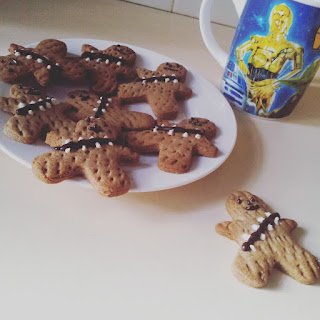
I also made these Wookiee cookies after seeing these super cute biscuits by Sugared Nerd.

I used a mini gingerbread person cutter, and melted chocolate for the details. I adore how they turned out!


I made this chocolate bark for my dad for Christmas - I added almonds, pepitas, pistachios, dried cranberries, and white chocolate chips to melted dark chocolate. I also made Dad some coconut ice using this recipe (except I used Stevia instead of rice malt syrup), a trail mix, and more gingerbread. I added twice the amount of ginger into Dad's batch than I used for the Wookiee cookies because both of us like our gingerbread really spicy (not that he wanted to share! ~___^)


Inspired by Messy Nessy Chic, I made this cheese platter Christmas Tree for after our family lunch. Honestly, we were all a bit too full for this, but we did our best anyway! ^___^


Lastly, I've been working on the Death Star blanket. If you've been a long time reader of this blog, you may remember that I started this project in, oh, 2011. It's been in the WIP box for a long time, but the new movie inspired me to get it back out. I've started joining the squares, which makes the whole project a little more inspiring - I've almost finished the rows with the laser! (Baby steps!) ^___^

- Lisa xx

Monday, 2 November 2015

Halloween 2015: Mermaid costume and spooky sweets review


Hello! So, Halloween is over for another year. I adore Halloween; I'm always so sad when it's finished! I've been told a few times this year that my hair looks like "mermaid hair", which is SUCH a lovely compliment that I decided to go as a mermaid for my costume ^____^


Rebecca and I were planning on hitting our regular rink for their Halloween skate session and then a party afterwards so I wanted something that would be comfortable enough to skate in.
 

I figured leggings and a skirt would be a practical combination and when I found this gorgeous shimmery scale fabric at Spotlight, I knew I was on the right track. I used this tutorial by Cal Patch to make my own pattern for the leggings and, aside from making them a little tighter around the knees next time, they worked out wonderfully!


I'm not yet at the stage where I feel comfortable enough wearing only leggings, so I also made a circle skirt with the same fabric. This video tutorial by Annika from The Pineneedle Collective was extremely helpful for this, but as my sewing machine was still broken at this stage, I had to get a little creative with sewing it together. I ended up doing the entire thing on my overlocker, and not hemming the skirt or adding elastic to the waistband. I'm a little worried that the waistband fabric will eventually stretch out; if that happens I'll have to reverse engineer in some elastic, but it was fine for a costume.


For the top, I printed out a picture of clamshells and used them to make a freezer paper stencil. I mixed up some light blue and light green fabric paint (I just diluted the colours I had with more white fabric paint) and used sponge brushes to add the blue on the top and green at the bottom. Then I used a brush dipped in both colours to mix them together in the middle of the shells and create a colour gradient look.


And then I put silver glitter all over them! One can never have too much glitter ^___^ Lastly, I made some hair accessories simply by attaching, with E6000, hair pin backings to some shells and starfish I had in my stash  (hoarding from childhood holidays *does* come in handy! ~___^)


The day after Halloween I hosted a crafternoon, and took the opportunity to test out some spooky recipes!


The strange pink lumps below were meant to be the Bloody Popcorn Brains by Not Quite Nigella, but mine are not quite as pin-worthy! My popcorn turned out really sticky, so making them into any real shape was seemingly impossible. I just ended up blobbing down lumps, adding some raspberry jam and calling them Blood Clots! They taste amazing though and are perfect for a special dessert treat or for curing diabetic hypoglycemia (I'd personally opt for the former!). 
 

The Spooky Worm Halloween Jello by A Spicy Perspective was voted "grossest-looking" by my guests; some wouldn't even try it due to its appearance! I'll grant that it's creepy looking, and the tapioca pearls lend an interesting texture to the jelly, but Scott, Rebecca, and I all quite liked the taste. I used lime and grape jelly and they turned out these lovely pastel colours, which went really well with the "witchetty-grub" lollies I found in the supermarket (I couldn't find plain old jelly worms like the recipe called for anywhere!). I used little ramekins as my moulds, but the jelly didn't come out cleanly. No matter, I think it looks even more gross this way ~___^
 

I'd never made chocolate bark before, and I found The Pioneer Woman's Halloween Bark tutorial very helpful even though I didn't follow her recipe completely. I melted white cooking chocolate, poured it into a tray lined with baking paper, and then pressed in salted pretzels, Star Wars character cookies, mini M&Ms, and pop-rocks. After sitting in the fridge for a while, it was ready to be broken up and served! This was the most popular dessert at the crafternoon; the salty-sweet combination was considered most superior by my friends ^____^ I personally think that the addition of the pop-rocks makes it a very appropriate Halloween treat as there is something rather creepy about your sweets making random cracking noises ...


Scott's favourite was the coffin cake; which is just a plain chocolate cake with peppermint icing. Can't beat the classics, I guess! I got the coffin-shaped pan from Spotlight and it does have a cross indentation on it, but that didn't show through very well on the finished cake, so I added my own with writing icing.


And that's it! Gosh! Did you have a fantastic Halloween? I hope you did, and that you dressed up! I love hearing about and seeing other people's costumes ^____^

- Lisa xx

Tuesday, 8 September 2015

Many hairbows


Hello! I know it's only just gotten into September, but for some reason I am so excited for Halloween this year! I was tidying my craft room (again! This has to happen fairly regularly, in order to try and curb my hoarding tendencies ...) when I came across a pack of "flat fats" (basically 50cm squares of fabric that Spotlight sells) in Halloween prints. I'd been thinking for a while that I might try to make a patchwork cushion but since I'd been thinking (and not doing) that for a couple of years I decided that the cushion idea was going out the window and instead I was going to make hair bows. And since I can't stop at one, I made ten.


Unfortunately I don't own enough Halloween fabric to make ten different spooky hair bows (something I obviously need to rectify fairly quickly!) but I did manage to make four.


These three are from the aforementioned Spotlight pack. I think my favourite is the stripey one, because those little purple gravestones are just so cute! Also in the pack was some awesome purple bat fabric, but as I used some of that for the background of Rebecca's witchcraft hoop I didn't have enough for a full sized bow. I may have to make some mini ones soon!


I also finally used this silky skull fabric that someone once gave me. The piece was kinda too small to do much with, so I put it in my stash and promptly forgot about it. I'm so glad I found it again because it was the perfect size for a bow!
 

Since one can never have too many hair bows (please, no one tell me otherwise ...), I then used up some more fabric remnants making these six pretties. I can't decide on my favourite here; I think the black and white stripe is going to be really versatile, but I love the dark grey floral pattern as well.
 

If you'd like to make some of your own, you can check out my tutorial for them on Cut Out + Keep
 

In other news, my workplace just finished a 100 day fitness challenge - huzzah! Of course this meant it was time for a party (nope, we learnt nothing) and so I baked a raspberry oat cake to help us celebrate. I used writing icing to draw a shoe on the top which was a bit tricky. You can see where I had some trouble with finishing off lines! Nonetheless, it looks like a shoe (big plus!) and the cake tasted really good - yay! ^___^
 

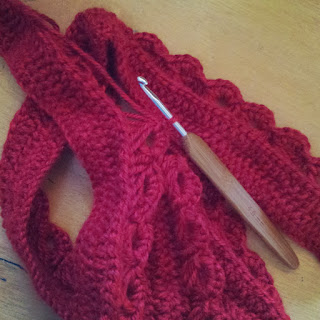
Currently I'm working on some crochet, but I think it's going to be a while before it's finished as it's pretty huge. The first row involved 364 stitches - yikes! I'm experimenting with broom stick crochet for this as well, which is a first for me. I'm quite liking how it looks so far, so I'm hopeful it will turn out well.

It's becoming sunnier and warmer here, so perhaps a largish crochet project wasn't the greatest idea though! I'll have to start thinking of warmer weather crafts ... perhaps this will be the year I finally make myself a Wonder Woman bikini? Only time will tell ~___^

- Lisa xx


Tuesday, 11 August 2015

My first weaving, and three cakes


Hello! How are you? This week I am NOT SICK! This is very exciting for me, as it means I can do things other than coughing and feeling sorry for myself. Case in point, I decided I need to start a new hobby (because I obviously don't have enough at this point ....) and so I got myself a loom and made a little weaving. Huzzah!


Now, let's be honest, it's pretty ugly. I started this project with no idea what the finished product would look like and since I was more interested in learning how to do different things rather than making a coherent design it's kinda ... odd.


I did have a lot of fun making it however, and even though it's not the prettiest thing I've ever made I'm still pleased with it!
 

I followed the weaving tutorials on A Beautiful Mess while making this, which was really helpful. In general I feel like that the actual weaving and tension is pretty good, but I need to improve on filling the gaps around shapes. 
 

I think my favourite part is the tassels; the yarn I used looks like it is finger knitted and it's really soft and fun to use. 
 

I used a vintage double pointed needle for the hanger since I had it on hand (it was passed down to me from my Nanna Tess) and I still don't know how to use DPNs.


One thing that I learnt was that when making shapes, filling in the gaps with a thin yarn is quite tricky, so going for a puffier, thicker yarn will save you some frustration in that area!


Taking photos of things on the walls in my house is quite difficult as the lighting is terrible, but I wanted to show you that it can actually hang. As you can see, it's ugliness sets off the ugliness of the brown bricks throughout our house quite well! ~____^


In other, more delicious news, I have been making cakes recently. You would have seen these if you follow me on Instagram but hopefully you won't mind a bit more cake convo ^____^


I made this Anzac cake for WARD's Skate Cleaning Fundraiser, which was such a great day! The icing is coconut, and has dinosaur sprinkles on it because, dinosaurs. They make everything better!
 

I made this overly pink cake simply because I was bored and I wanted to. It's another pink coconut cake, with pink coconut icing, and sour peach hearts as decorations. It was delicious, but didn't really taste anything like coconut ice which was what I was kinda going for. I'll have to work on that!
 

Lastly, I made a cake that wasn't pink - omg, right? I made this cake for the bake sale at a roller derby double header between WARD and PRD. I was a non-skating official, so I couldn't wear WARD colours, but no one said my cake couldn't! WARD's colours are green and black so I made a chocolate and peppermint marble cake. I used to love making marble cakes when I was a kid but I hadn't made one in years, so I was super pleased with how it turned out. They really are so fun and easy to make. I added peppermint icing to the top of the cake, and finished it off with those little edible silver balls. They remind me of ball bearings, which I figured was perfect for a skating cake ^____^


Well, this post has succeeded in making me totally crave cake! Next week my post will be all about The Addams Family - huzzah! I've set myself a challenge to make three crafts inspired by those wonderful creeps and I can't wait to show you what I come up with!

Until then,

- Lisa xx