Showing posts with label geek. Show all posts

Sunday, 27 January 2019

Crochet Beholder Amigurumi


Hello! One of my resolutions this year is to actually post on my blog, so here I am! I'm going to aim for at least one post a month, but if you want to see more of my nonsense, do feel free to find me over on Instagram.

So, in my last post (from JULY 2018! Far out I've been slack!) I talked about how Scott and I have been playing Dungeons and Dragons with a group of our friends. We're still doing that and when I asked Scott what he'd like for his anniversary present this year, he requested a Beholder, which is a monster from D&D.


I found a great pattern by Aja Moniz on Ravelry and used that for the base of my Beholder, but I did make a few changes.


The pattern picture shows a Beholder with six eye stalks, but Scott wanted his to have ten, so I made a few extra stalks. I also decided to use safety eyes instead of using embroidery. The mistake I made with the safety eyes is that I decided to do that after I'd finished crocheting the eye stalks so if I made another one, I'd crochet the rounded bit of the eye, stick in the safety eye, and then continue to crochet the stalk.


I also wanted the Beholder to have more teeth as the official D&D artwork shows that they are very dentulous. Instead of crocheting the teeth, I cut out strips of fangs from white felt and then used a felting needle to attach the strips to the mouth area.


I intentionally used some different types of safety eyes, but I wish I had have had even more variety in eye colours. I think that since each eye of the Beholder has a different power, having different colours would be a cool way to indicate that.


Scott picked out the yarn for his Beholder and the purple that he chose for the body is some that I actually dyed myself! I liked how the colour come out, but the wool itself was pretty stiff and scratchy so it went into the stash box instead of being used for the scarf I originally wanted to make. It was a good yarn for amigurumi though, and it wasn't rough enough that it hurt my hands to use. Unfortunately I don't actually know any of the brands I used for this project as they have all been in the stash box without their labels for a long time!


I don't think he's as scary as the "real" Beholder, but Scott likes him anyway!

- Lisa xx

Sunday, 10 April 2016

BB-8 amigurumi


Hello! Well, I decided it was finally time to show you the photos of my completed BB-8 amigurumi!


I used a pattern by Mysterious Cats and it was totally worth the $4.66! ^___^ It was very easy to follow and quick to work up. I actually finished making this little BB-8 at the end of last year, on the same day that I started making them. That's gotta be some kind of record!
 

But then I had all these ideas about staging for the photos - like making a background of Jakku and making a Rey costume for one of my Blythe dolls so they could pose together - and as a result I procrastinated over taking any photos for four months. I expect that is also some kind of record!


Anyway, when I was taking photos of my Bee cosplay, I also grabbed BB-8 and finally did a little photoshoot. There is a little sandy patch under our letterbox in which nothing grows, which I figured was close enough to Jakku ~___^
 

Also, can you believe it's only just over three weeks until International Star Wars Day? I haven't even decided what I'm going to make this year!


I think there is a strong possibility it will be another iteration of BB-8 though; just look at that adorable little face!


- Lisa xx

Monday, 25 January 2016

Baking, succulents, and parties


Hello! I realised recently that I have an awful lot of photos of little things I have made/ baked, but I haven't shared them with you! You may have seen some of these on Instagram, but here we can talk about them a little more without having to make those huuugggeeee comments that end up looking like a really dense wall of text ~___^

First up: ugly cake! Scott and I recently celebrated our sixth wedding anniversary for which the traditional gift is salt. I thought that sounded a little boring so instead I decided to make a salted caramel cake. I wanted to make a layered cake, but I also didn't want it to be huge so I made a rectangle shaped upside down cake, and cut it into smaller circles. The caramel part of the upside down cake means that I didn't have to put anything between the layers.


However, cutting nice looking circles from cake is actually a lot harder than I expected it to be! When I layered them up, I realised how wonky my cake was! >___<


I thought about covering the entire thing in buttercream icing to try and make it look nicer, but ultimately decided that salted caramel layers and a salted caramel sauce poured over the entire thing was probably enough forms of sugar for one small cake so I left it naked and ugly ~___^ We ate it anyway, and it tasted pretty good!

I also made a simple card for Scott. I used a black and white chevron paper to cover a blank card, glued on a square of gold heart patterned paper, and stuck a black and gold embellishment in the middle. I messily scribbled a border around the heart paper with my silver metallic pen and it was done!


Bunnings had a heap of tiny succulents for sale recently, so I brought, ummm, way too many of them. I put one in a tiny teacup to give to a friend for her housewarming, and put two more in two empty tins I kept because they're cute. I added dinosaurs because dinosaurs are awesome.


I put the rest in a bigger pot, and added more dinosaurs and some pretty little rocks. I'm not sure how well that one in the middle is going; I brought it because I thought it was a cool colour, but I'm now thinking that perhaps I brought a dying succulent. Hmm.

I designed a badge to give to some of my derby pals, and recently two of my buddies from skating star classes had their birthday so I used two of the leftover pins to decorate some hair bows. The fabric I used is the same design as the badges, which I got printed from my Spoonflower store.

For my birthday I had an Adventure Time themed party - I didn't take many photos but I did remember to photograph some of the food (the most important part, right! ~___^)

I made Lumpy Space Crackles with using this recipe ... except I didn't put in any cocoa and I used honey instead of maple syrup. I also added some blue and red food colouring which didn't mix in that well. I was hoping for it to make purple, but it mostly didn't. I also put on some star shaped sprinkles to make them more space like ^___^


I brought some Adventure Time cookies, but they didn't taste that great so I made them into chocolate bark, with the addition of salted pretzels and pop rocks. They were a big hit!

I also made a Tree Trunks apple pie; the fancy lattice top was trickier to make then I expected it to be! It tasted really great and even though it was huge, it got demolished really quickly.

These sunglasses were made for my friend Clare for Christmas. Clare has an adorable style and is a big fan of daisies, so I wanted to make her something to suit her look.


All I did to make these was glue little daisy cabochons around the frame of some round sunglasses. It was really easy, but they turned out really cute!

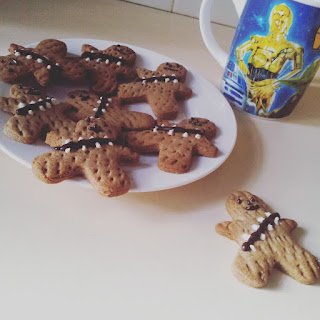
I also made these Wookiee cookies after seeing these super cute biscuits by Sugared Nerd.

I used a mini gingerbread person cutter, and melted chocolate for the details. I adore how they turned out!


I made this chocolate bark for my dad for Christmas - I added almonds, pepitas, pistachios, dried cranberries, and white chocolate chips to melted dark chocolate. I also made Dad some coconut ice using this recipe (except I used Stevia instead of rice malt syrup), a trail mix, and more gingerbread. I added twice the amount of ginger into Dad's batch than I used for the Wookiee cookies because both of us like our gingerbread really spicy (not that he wanted to share! ~___^)


Inspired by Messy Nessy Chic, I made this cheese platter Christmas Tree for after our family lunch. Honestly, we were all a bit too full for this, but we did our best anyway! ^___^


Lastly, I've been working on the Death Star blanket. If you've been a long time reader of this blog, you may remember that I started this project in, oh, 2011. It's been in the WIP box for a long time, but the new movie inspired me to get it back out. I've started joining the squares, which makes the whole project a little more inspiring - I've almost finished the rows with the laser! (Baby steps!) ^___^

- Lisa xx

Monday, 16 November 2015

Harry Potter art canvas


Hello! This year Rebecca and I decided to give each other Halloween gifts ... and then we both promptly didn't finish them in time for actual Halloween. BUT, I have finally finished Rebecca's gift and she has received it and now I can show it to you!


Bec has always said very kind things about my art canvases (which, to be honest, seems like a term which is a bit too fancy for what I actually create, but you can see them here, here, here, and here), so I decided that she better have one of her very own. I decided on a Harry Potter theme since Bec and I are Potterheads from way back, and making this type of canvas is easier if you know lots of random little things about a fandom.


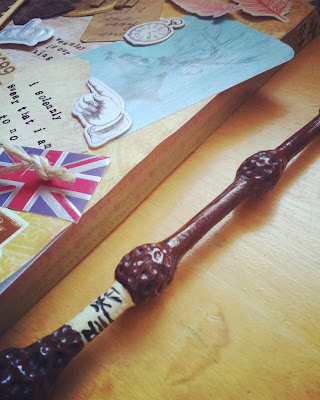
In this picture you can see a library card for Hogwarts: A History with (nerd alert!) names and approximate appropriate dates for confirmed canon Hogwarts students, a laminex heart that I made from a sample card from the hardware store, a stag cutout to represent Harry's patronus, and a whole lot of stamping done with my mini alphabet set. I really love this stamp set, and I use it so much; I didn't really try to get the letters straight on this project though because I felt like it gave a more Daily Prophet style feel.


I made a winged key simply by cutting out two vaguely wing looking shapes from scrapbooking paper and sticking them underneath a wooden key embellishment. I inked the edges of the wings and curled them up a bit to give a bit more texture.


Since woodland themes are just going out of fashion in scrapbooking now, I found a huge kit of embellishments and cutouts at the discount shop for super cheap - huzzah! The wings, blue stag card, and the stag cutout from before are all from the same kit. I stuck the wings on with double-sided sticky foam which kinda makes them look like they're floating - perfect for the wingardium leviosa spell! ^___^ I wish I had brought up on supplies a few years ago when owls were in though, because no owls were included in this particular woodland kit ; ___ ;


Other things that you can spot on this canvas include a vintage suitcases sticker from a Amy Tangerine remarks set, a silver crown and Union Jack from a Ruby Rock-It Vintedge (yup, that's how it's spelt!) Imprints sheet, two clocks and a pointing hand also from Ruby Rock-It, two chipboard letters that I coloured gold with a paint pen, kraft paper tags that I wrote and stamped on to make the Hogwarts Express luggage tags and the tag under the HP, and a random gold embellished circle gift tag that I drew a lightning bolt on. Oh, and washi tape. Always washi tape.


The most important step of making an art canvas is to mod podge everything down afterwards. Seriously, I tried to skip this step because I thought double-sided tape and glue would be enough. Spoiler alert: it's not. 

I brought a few more canvases while I was at the discount store (seriously the best place to get canvases in this city) so I may have to spread out all my supplies (again) and make a couple more! What fandom would you choose? 

- Lisa xx

Tuesday, 27 October 2015

Captain America and The Winter Soldier crochet mismatched fingerless mitts


Hello! True to my word I have been taking a short break from blogging to work on some slightly more involved projects. I've also been fitting in a lot of extra hours at work, 2-3 skating sessions a week, and a heck ton of gardening! ~___^ So here's one of the projects I've finished: mismatched Captain America and Winter Soldier fingerless mitts. Yay!


I made these for Rebecca, as it was her birthday recently, and we share all the feels about Cap and Bucky. I have seen versions of this around before, but they were all knitted and since I'm still not a very confident knitter I decided to crochet them instead.


I used Twinkie Chan's instructions for a basic mitt pattern to determine the size these should be (as this varies depending on hand size) and used a 4mm hook and some 100% DK weight wool to make them.


For the Winter Soldier mitt I crocheted in the back loops every second row to create a kind of ridged pattern to mimic the segments of his metal arm. The star was extremely frustrating to make because most applique patterns were way too big. I ended up making it up as I went along, but I'm still not totally happy with it. If I ever discover a way to make a nice small star, I'm going to steal this mitt from Rebecca and replace the star ~____^
 

For the Captain America mitt I just did a plain treble repeat and I used Handy Knitty's pattern to make the "A".


The little wings on either side of the A were a little tricky to do, because again most patterns were much too large. I ended up using a similar technique to how Handy Knitty forms their letters. I chain stitched nine, slip stitched in three, chained two, slip stitched in three, chained two, slip stitched in five. The extra chain stitches form the two lower wing protrusions, and if you're trying to imagine how it is worked up, please enjoy this extremely high-tech Paint drawing, in which the red arrows indicate the direction you are working in.

 
The two sides are made exactly the same way, and I just flipped one over once I was finished crocheting. They need to be sewed down to really look like Captain America's helmet wings, but once they are attached I think they look pretty neat.


Can you believe it's less than a week until Halloween?? I haven't done many spooky projects this year, but I will have a costume to show you which I am pretty darn happy with. What are you going as this year? Are you making your costume? ^___^

- Lisa xx