Showing posts with label vintage. Show all posts

Tuesday, 2 December 2014

A refurbished school desk for vintage rustic wedding


Hello! So, I have working on this project for a month but now I can finally show you! I had this old school desk in storage with the plan of fixing it up someday and then my brother Brett requested it as the signing table at his wedding so someday finally happened!


Here is what it looked like to start off with; I had started trying to take some of the paint off on the corner and discovered that there were at least four layers of paint on it. With further work, Scott and I counted seven different colours of paint! I feel like these pictures don't really give justice to how ugly this desk was. The paint was obviously never sanded back before any of the previous layers so it looked crusty, the inside was a delightful combination of paint and rust, and the whole thing was dirty. Gross.


Scott and I started off by coating everything in paint stripper and then stepped back to watch the magic happen! Spoiler: nothing happened. All the paint stripping videos I'd watched on youtube had shown a wonderful bubbling potion like effect, and all we got was a sticky desk. Disappointing. Nonetheless, we started trying to manually scrape off the paint. I was still finishing uni at this stage, so we were mostly doing this on the weekends and worrying that it wouldn't be finished in time. The weekend before the wedding, we realised that there was no way we were going to get all the paint off, plus we still had to paint and seal it. At this stage, we had most of the paint off the wooden top, but the legs were a streaky mess. Luckily, my dad, Kevin, had just recently found a second hand wire brush attachment for his angle grinder so we made plans to head down to the country a couple of days early and get this desk cleaned up properly!


We had managed to loosen up the paint well enough that we could detach the top from the base; the screws had been painted over so much that they were originally completely invisible under all the layers! With some help from the angle grinder, orbital sander, and belt sander, we finally removed all the paint. I swear I heard some of kind of angelic chorus at this stage! 


We painted over the metal again (it was almost physically painful) because otherwise it would have rusted and all that work would have been for nothing! The paint we chose included a primer, is made to prevent rust, and was a very close match for the colour of the bare steel. You can see the hinges and some of the screws in this picture; they were so coated in layers of paint that we had to use the wire brush attachment to grind it all off and, for the screws, file deeper notches in the heads so a screwdriver could actually be properly used on them! Shoutout to Kevin for working that one out! ~___^
 

We used a sanding sealer on the wooden top of the desk which deepened the colour of the wooden into this lovely golden shade. Since Brett and Lavinya's wedding aesthetic was vintage rustic, we didn't putty up the scrapes in the desk. This desk has gone through a couple of generations of school kids and we wanted that to be evident! ^___^


There is still some work to be done on it though; we painted the desk Thursday afternoon and figured with a 4 hour suggested drying time it would be fine for Friday afternoon. But, it was very cloudy and humid and when it was moved to the ceremony location some of the paint got scuffed up >____< Also, one of the inner corners of the lid is badly damaged and the hinge couldn't be properly attached. So, after the ceremony (which was beautiful!) the desk went back to live in Kevin's shed for a while; I'm hoping to visit again before Christmas and finish up these last remaining touches.


It does look so much better though, Mum and Scott are both wanting to take it home now! I guess we'll have to wait and see who wins this bit of furniture tug-of-war ~___^ Also, can we just stop for a minute to admire Anne and Kevin's garden? The grass was legitimately that green! Brett and Lavinya's reception was held in mum and dad's garden so they did heaps of work on it and it looks gorgeous!


I did make one other small thing for the wedding; Anne had this vintage suitcase for guests to leave their cards in, but it needed a little something-something. I used baker's twine, chipboard letters and hearts, gold paint, and a scrap of hessian to make this little banner. I felt very lucky to be able to sit down and mess about with craft supplies while everyone else was working so hard! But don't worry, I chipped in more afterwards ~___^
 

As per usual, I completely forgot to take any photos on the actual day! One of Anne's friends, Michele, took this photo of the back veranda where we all had dinner. Almost 70 people were seated here; good thing my parents are fans of a big veranda area!


Anne snapped this photo of Scott and I just after the ceremony; I'm not sure what we're giggling about. Perhaps what a high refraction index my pale, pale skin has?


And, of course, I remembered to take a selfie ~___^ My curls lasted for so long, all I did for the next four days was gently brush them back into place and they looked so great! For my hair this is seriously low maintenance, I want to get my hair set every week now! ~___^
 

I love weddings; it was so nice to see all my family fancied up and having fun together! I am hoping that the professional photos turn out well so I can have photographic evidence of how well we all scrub up ~___^

I'm quite sure my brother doesn't read my blog, but nonetheless; another big congratulations to Brett and Lavinya!

- Lisa xx

Monday, 24 March 2014

A pillbox hat for a night at the theatre


Hello! Do you like dressing up? I do! I love to wear costumes and pretty dresses but sometimes it just feels like there aren't enough reasons to really get out the glad rags, you know? So I really try to seize any opportunity to overdress! ~___^ Rebecca and I decided to go and see A Murder Is Announced last week and since it's a stage show, and set in the '50s, we went all out! ^___^


I wore a gorgeous halter-neck dress with a sweetheart neckline and the most fluffy skirt ever - which I promptly made even fluffier by adding my petticoat underneath. There is no such thing as a skirt that is too fluffy. We had decided we wanted to look like '50s ladies, so I added a set of vintage pearls, a vintage handbag, and a handmade pillbox hat and gloves. I also had a lot of fun trying out victory rolls! Rebecca did credit to the motto of "make do and mend" by making her skirt, and thrifting her top and clutch purse. I wish I had a better photo of her hairstyle too! She did a great job working her shorter hairstyle into victory rolls and twists ^___^ Since it was an evening show, Rebecca also wore a gorgeous vintage fur stole while I favoured vintage black velvet.


My pillbox hat was a lot easier to make than I thought it would be and really adds that little something something to the outfit, but unfortunately I didn't take any photos while I was making it! I did take some additional photos in better lighting though, as it is a little hard to see the full hat in the outfit photos above.
 

I made it from the lid from a plastic container, black satin, a big black and white ribbon (it's reversable), some black tulle, and a lot of hot glue!


Here is how to do it!
1. Cover the outside of the lid in black satin
2. Add a circle of black satin to the inside of the lid
3. Glue one end of the ribbon to the inside of the lid, wrap it around the lid in a nice-looking way, adding glue to twists to prevent movement
4. Secure the other end of the ribbon to the inside of the lid
5. Arrange the tulle over the lid, wrapping the gathered end into the inside of the lid
6. Fasten the tulle by adding glue to scraps of ribbon and pressing them over the tulle
7. Make a big bow with the rest of the ribbon and glue it to the back of the lid. I made this bow by making two circles with the ribbon, one smaller than the other, then wrapping a smaller length of ribbon around them both and gluing everything into position. I also glued the ties to the underside of the bow.
8. Glue on a small hair comb of the inside of the lid, underneath the bow.
 

The inside isn't very pretty looking,but it gives you more of an idea of what's going on under there ~___^ The hair comb I used doesn't secure the hat to my head perfectly, but it does add stability while I add in bobby pins and means that I don't need to hold it on my head while I'm fastening it on.


We were definitely the most overdressed people at the theatre, but it was so much fun! I think I've also overcome my fear of victory rolls now, which is very good since as I looked at so many photos of actual vintage hats in preparation for making this one I've got many many millinery plans, so I'll need to be getting better at the hairstyles to match! ~___^

- Lisa xx

Monday, 10 March 2014

Fruit brooches and an eggplant outfit


Hello! I feel like I've had fruit on the brain lately! I have been craving smoothies constantly, plus I've been seeing so many awesome fruity crafts around the place!


Case in point, I used a pattern from Repeat Crafter Me to make these adorable little crochet fruit coasters. Although, since I already have a set of coasters I am making these into brooches instead. I can never have enough brooches! ^___^
 

I think the strawberry is probably my favourite, but I'm looking forward to wearing all of these! I can also highly recommend the patterns; they are very easy to follow and very cute! ^___^
 

Another thing that caused me to have fruit on the brain was an invite to a "fruit salad" party. Apparently aubergines are technically a fruit, so I decided to to go as an eggplant, because, you know, why not? ~___^ 
 

I didn't have to buy a single thing for this outfit, which is a definite plus! I didn't have a purple bag to bring though, so I used this vintage green bag, which was possibly crocheted by my grandmother. It's definitely handmade, but I'm just not sure by whom! ^___^
 

Of course, just dressing in purple does not an aubergine make, so I also made myself a little fascinator and also an eggplant buddy in case people didn't know what I was meant to be.
 

They were both very easy to make and I used felt for both. For the fascinator, I cut out two shapes from felt, plus a slightly smaller piece from thin cardboard. I stiched the felt around the cardboard with a running stitch. For the stem, I rolled up a piece of felt, added a few stitches across the bottom so it wouldn't unravel and then sewed it to the main hat piece. I didn't add any stitches to the top or sides because I liked the way it looked when slightly open.
 

For my aubergine brooch, I just cut the three shapes from felt and then stitched them together. I used a running stitch here too as I thought it would complement the fascinator nicely ^___^
 

And I gave him a little face because, well, everything is cuter with a wide-eyed smile! ^___^


I loosely stitched a hair comb to the underside of the fascinator so that it would stay on my head which, I am pleased to report, worked wonderfully. Giving the stitches a bit of flex is a good way to ensure your fascinator will be able to adjust around the comb without it breaking! I have ruined many a haircomb with handmade fascinators, but I am apparently starting to learn my lesson now ~___^


I'm not over the fruit craze yet though; I'm just getting started! I think I'll do something with pineapples next ...

- Lisa xx 

Thursday, 16 January 2014

Assorted thriftiness


Hello! After finally managing to find these photos in my phone (I swear it hides things from me!) I thought I'd share with you what I picked up on the second annual op-shopping road trip that Rebecca and I did ^___^


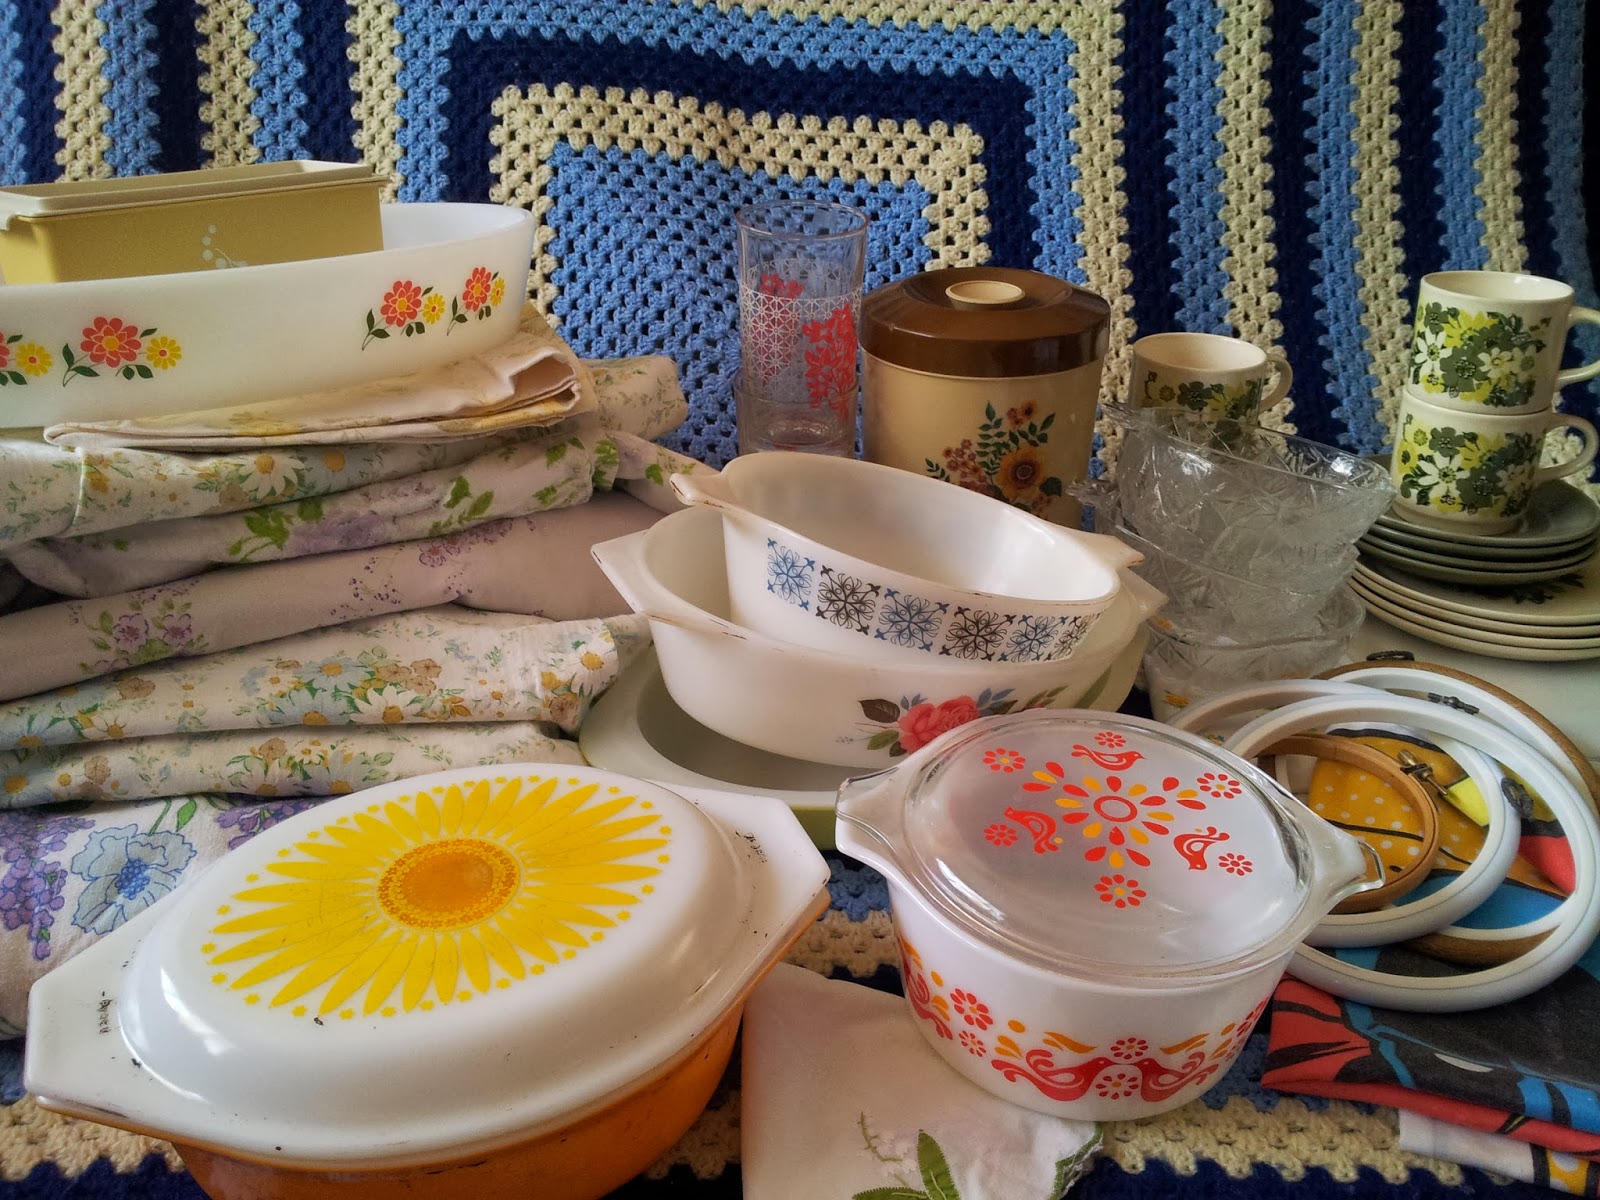
Here's an overview. Um, wow, right?  You've already been introduced to my new pyrex pieces, but I did find some other cool things as well! ^____^ In the top left hand corner you can see my newest tuperware piece. I love finding old tupperware! It's usually still got the seal intact, and it makes my pantry look so much neater ^____^ This one was only a couple of dollars - huzzah! ^____^ At the bottom is my one and only doily purchase this trip (I try not to buy too many of these as they really serve no practical purpose ... but they do look very pretty!); this one is hand embroidered with a lily-of-the-valley. I always find it hard to leave handmade things behind in op-shops, don't you? ^____^

  
I got four new embroidery hoops, which is really excellent because since I've been doing hooplas I've been going through them like hotcakes! ^____^ I also picked up two DC comics pillowcases. I'm really hoping that I'll find superhero sheets one day because I really, really want to make a dress from them. Finger crossed!


This set of Johnson teacups, saucers, and plates was only $2.50 so I really couldn't justify leaving them behind, even though they are not the type of china I normally buy. They're a bit more practical for everyday use than my fancy bone china teacups and saucers though and I've been using them quite a bit ^____^
 

This cute canister has a crack that prevents it from being airtight, but it was 50c and I'm planning on using it for craft room storage. The two glasses are, hopefully, the start of a vintage glassware collection and were $1 for both. All my other glasses are super plain and boring, so it's nice to liven it up a bit! ^____^ Also in this picture you can see the additional four pineapple bowls that I got to match the seven piece collection that I brought previously. I'm going to need to have a dinner party and insist on a pineapple dessert, I think! ^____^
 

I really hit the vintage sheet motherload on this trip and ended up with six sheets and three pillowcases. Once I get past my fear of actually cutting into them, I plan on making some pretty dresses from these ^____^

Gosh, going through these pictures has made me want to go thrifting again very soon! Do you have a favourite thing to get second-hand? 

- Lisa xx

Tuesday, 7 January 2014

Pyrex is a girl's best friend


Hello! Oh my gosh, this post has been a long time coming! I finally took photos off all my vintage pyrex today, and you can see how long it took from how the light changes throughout the pictures ~___^ Not *all* of these are actually actual pyrex, but I've learnt that there are actually three brands of "offical" pyrex and then there are a ton of other brands as well ... anyway, here's what I've got and what I've learnt! ^___^


This is the first piece of pyrex I collected, and it's JAJ Pyrex which means it was made in England. This brand is also sometimes called Crown Pyrex, and the maker's mark can be the initals JAJ, a crown, or both. This pattern is called Indiana and is possibly from 1969.


This is also JAJ Pyrex. This pattern is called Chelsea and was apparently produced from 1968 into the 1980s. 


This is my first piece of American Pyrex! It's normally just called Pyrex, apparently the Pyrex company started in America and then licensed production to England (i.e. JAJ/Crown) and then to Australia (i.e. Agee - some examples of which are coming soon!). This pattern is called Daisy, or sometimes Sunflower, and is from about 1964 til about 1974.
 

It's also super dirty! I haven't had any luck getting these stains off, but I haven't been trying anything too chemically or abrasive in case I ruin it. Any suggestions for cleaning would be very welcome! ^___^


This design is called Cottage Rose and is another from JAJ Pyrex, produced from 1970 to 1971. I adore this pattern, it's so pretty yet still quite bold.
 

And I have two pieces in this design! ^___^

They are the same shape, but different sizes. I'd love to collect all the sizes in this design ^___^


This big dish is from France, which I thought was pretty cool! The company is called Arcopal, and the design is called Little Daisies. It's quite sweet, and I love it even though I'm not sure if it's "real" pyrex.


This is a piece of Agee Pyrex, and it's the only divided dish that I have (currently!). Agee Pyrex didn't have as many patterns as American or English pyrex, as far as I can tell, you could basically choose from clear, green, blue, or 'biscuit', although some ads do have 'coral' as well.
 

I found this awesome ad from the Australian Woman's Weekly which shows what the Agee Pyrex range was like in 1952 using Trove. They actually have a whole bunch of old magazines and newspapers digitized so it's well worth checking out ^___^


Back to America, and this design is called Friendship ... or the Pennsylvania Dutch Bird Scene, which is a bit more of a mouthful, or Birdie, or Friendship Bird, or Red Rooster (which is also the name of a fast-food chicken shop here in Australia) ~___^

I am so pleased that I got the matching lid for this piece, they look so lovely together ^___^
 

I brought this from a tiny op-shop where basically everything is two dollars (the best kind! ~___^) and they had a larger lid in the same design so I hunted around to see if there was another dish, but had no luck. I checked with the lady at the counter, just in case, and her response was to say "no, nothing goes with this one. Oh, and it's chipped." And then she threw it in the bin o ___ o I told her I'd pay .50c for it, she said I could have it for free if I fished out of the bin. The things I do for pyrex! ~___^

 This one is a Fire King piece, which is one of those brands which is similar to pyrex, but not actually made of the same thing. This design is called Primrose and was made from 1960 til 1962.


This is another English piece and the design has quite a few names! Apparently it can be called Woodland, Wildflowers, and/or Country Autumn. Take your pick, I guess! ^___^ It also had quite a short production run, being produced only between 1985 and 1988. I was born in '88, so I think it would be lovely if this dish was the same age as me ^___^


And speaking of short production runs, this one is called Rustic and was made by JAJ between 1980 and 1984.


Another short production run; this design is called Butterflies (ummm ... maybe?) and was made from 1983 - 1984 in England ... maybe. It's been really hard to find much information on this design! If anyone knows anything about this design (or any of the designs, really!) I'd love to hear from you ^___^


Although they don't match, I really like how Wildflowers and Butterflies look together. They're really both quite cute, aren't they? ^___^


This long dish (or lid, maybe?) is from Agee, yet, interestingly, is a different colour from my other piece of Agee. The little bowl is probably not any kind of pyrex, as it has no maker's marks, but it's the same colour and the little lip makes it a practical thing to have so *shrug*


This design is called either Tuscany Vegetables or Market Garden and is by JAJ Pyrex. It started being made in about 1971.


Although the timing is a bit out, I'm very tempted to make this Spagetti Casserole in my Tuscany Vegetables dish - yum! ~___^


This design is from 1972 and is called Carnaby Tempo. It's another one produced by JAJ Pyrex and always seems really familar to me for some reason. Perhaps one of my family members had something in this design once? I've no idea, really.


I love the contrast of the white lid against the blue dish in this design, which is American Pyrex Snowflake Blue, also called Winter, Snowflake Garland, or just Snowflake (although the latter is apparently incorrect).


This design was apprently produced during the '60s and '70s but it was obviously very well cared for as it looks almost new!


This dish is marked with "Pyrex 16" - and that's it! I haven't been able to find anything else about it at all. It's a mystery dish!


As is this one, maked "Pyrex 17". Curiouser and curiouser!


This one is marked only with the number 17. Very strange!
 

Also, it's kinda weird looking, don't you think? Like the designs printed on it don't really go together? It's interesting, nonetheless!


This isn't maked with anything! But, I did manage to find out that this is made by Hazel Atlas and this pattern is called Ivy. Awesome! Solving mysteries is the best! ~___^


This design is by Agee! This is the only printed piece of Agee that I have, and I don't know the "offical" name of it so I've just been calling it Strawberries. (Groundbreaking, Lisa!) ~___^
 

So, I've got kinda a little mismatched collection going of strawberries and ivy. Random, but I like it ^___^


This piece of Pyrex is really interesting; well, it is to me anyway! ~___^ It was produced in England, but is maked with the Nestle's logo. This is because you could get it by sending in labels of sweetened condensed milk to Nestle's - sounds like a pretty good deal to me! ^___^
 

I don't know how to work out how much money a 1959's housewife would have been expected to send in, but this dish was apparently worth one pound, which today is about $35. So, I've got the dish, now I just need to make the rice pudding to go in it. ~___^


Pyrex really likes their florals, huh? ~___^ This platter is made by JAJ and is called Autumn Glory. It was produced from 1969 but I don't know for how long.


And I have this design in a dish too ^___^


I've seen this design on teacups and saucers too, but I've never found any in real life. Pity!


This platter design is called June Rose and is another from JAJ Pyrex. This one was produced from either 1966 or 1967.


This little dish (which I have photographed rather poorly, as the flowers are actually a much lighter colour) is made by Termocrisa, which is a Mexican brand. It's like Fire-King in that it's not *really* pyrex, but many people advertise it as pyrex.

And that's it! Wow! I hope you enjoyed this post, even though it was a bit of a departure from my usual content! It's actually been really fun researching all these different pieces, although now I have a mile long list of all the other designs I'd like to collect! Well, I guess I'll take my advice from this 1949 ad ...

 
Thanks, vintage housewife lady!

- Lisa x