Showing posts with label Harry Potter. Show all posts

Tuesday, 22 December 2015

Harry Potter book quote ornaments


I'm usually on the fence about book art; I love the look, but the thought of destroying books makes me slightly anxious. However, recently Scott and I were weeding our book collection and we discovered his old copy of Harry Potter and the Goblet of Fire. Teenage Scott was obviously pretty hard on his books, because it was falling apart. Like, literally; the back cover was gone, the binding was shot, and pages were coming out. (Don't worry - mine is still in perfect condition! ~____^)


This was apparently all the encouragement I needed to start destroying it more - and creating some new ornaments out of the leftovers!
 

These are honestly so easy to make. All you have to do is cut up the book pages into thin strips (I cut out single lines of text), push them into clear ornaments (I got mine from the craft store, and the tops come off!), and add some glitter ^____^


I still don't have my big tree up (!!!) so I did a little photo shoot with my baby tree.


I really like how they turned out! I chose lines that I thought were interesting, or funny, or just mentioned favourite characters (Fred! ; ______ ;) so it's fun to look at the ornaments and try to read the little sentences.


To all those who celebrate around this time of year, I hope you have a merry, joyous, and/or happy one! To everyone else, I hope you still get a day or two off work! ~____^

- Lisa xx

Monday, 16 November 2015

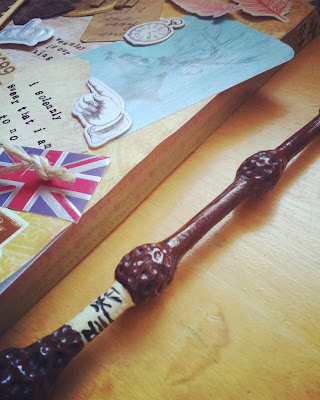
Harry Potter art canvas


Hello! This year Rebecca and I decided to give each other Halloween gifts ... and then we both promptly didn't finish them in time for actual Halloween. BUT, I have finally finished Rebecca's gift and she has received it and now I can show it to you!


Bec has always said very kind things about my art canvases (which, to be honest, seems like a term which is a bit too fancy for what I actually create, but you can see them here, here, here, and here), so I decided that she better have one of her very own. I decided on a Harry Potter theme since Bec and I are Potterheads from way back, and making this type of canvas is easier if you know lots of random little things about a fandom.


In this picture you can see a library card for Hogwarts: A History with (nerd alert!) names and approximate appropriate dates for confirmed canon Hogwarts students, a laminex heart that I made from a sample card from the hardware store, a stag cutout to represent Harry's patronus, and a whole lot of stamping done with my mini alphabet set. I really love this stamp set, and I use it so much; I didn't really try to get the letters straight on this project though because I felt like it gave a more Daily Prophet style feel.


I made a winged key simply by cutting out two vaguely wing looking shapes from scrapbooking paper and sticking them underneath a wooden key embellishment. I inked the edges of the wings and curled them up a bit to give a bit more texture.


Since woodland themes are just going out of fashion in scrapbooking now, I found a huge kit of embellishments and cutouts at the discount shop for super cheap - huzzah! The wings, blue stag card, and the stag cutout from before are all from the same kit. I stuck the wings on with double-sided sticky foam which kinda makes them look like they're floating - perfect for the wingardium leviosa spell! ^___^ I wish I had brought up on supplies a few years ago when owls were in though, because no owls were included in this particular woodland kit ; ___ ;


Other things that you can spot on this canvas include a vintage suitcases sticker from a Amy Tangerine remarks set, a silver crown and Union Jack from a Ruby Rock-It Vintedge (yup, that's how it's spelt!) Imprints sheet, two clocks and a pointing hand also from Ruby Rock-It, two chipboard letters that I coloured gold with a paint pen, kraft paper tags that I wrote and stamped on to make the Hogwarts Express luggage tags and the tag under the HP, and a random gold embellished circle gift tag that I drew a lightning bolt on. Oh, and washi tape. Always washi tape.


The most important step of making an art canvas is to mod podge everything down afterwards. Seriously, I tried to skip this step because I thought double-sided tape and glue would be enough. Spoiler alert: it's not. 

I brought a few more canvases while I was at the discount store (seriously the best place to get canvases in this city) so I may have to spread out all my supplies (again) and make a couple more! What fandom would you choose? 

- Lisa xx

Saturday, 10 August 2013

Crochet pygmy puff


Hello! How are you? I hope you're doing well! Earlier this week I made a Pygmy Puff plushie and then today, because I'm a bit strange sometimes, I decided to set up a bit of a photo shoot as if it was real and about to head off to Hogwarts with it's young owner. If you want to skip over my ramblings, feel free to scroll down to the bottom of the post where I tell you how to much your own ^_^


 Arnold was originally Ginny Weasley's Puff, and after all these years he's still a mischievous little thing with a tendency to get in places where he shouldn't. He's fat and cuddly and has become more pink in his old age, although his face and ears are still purple, along with some of his fur.


Now he's going back to Hogwarts with a new Weasley. A little witch in her second year who likes knitting and chess and is bringing hand luggage on the Express because she can't bear to have all her books packed away in her trunk for such a long time.
 

She's got a brand new copy of Hogwarts: A History, a couple of sickles to buy a treat on the train, and an old suitcase that she found in the attic of Grandma and Granddad's house.
 

It's a good thing that September 1st is still a while away though, because her trunk is still a bit of a mess and she's only just found the four missing pieces from her chess set.
 

Arnold isn't helping with the packing much. He just likes to lick the old leather on her suitcase and her camera case; he's a bit weird. But he is rather cute, so she'll probably forgive him.  


Is that a Slytherin tie? Well, yes. She's the first Weasley in centuries to be Sorted into that House, but her family doesn't mind so that's ok and anyway, she rather likes it there.


She's got her robe and tie packed so she doesn't have to wear them the entire train journey, and she's just realised that she really does need more ink. And is four books really enough? I mean, it is a long trip ...
 

It's been a long time since I wrote fanfiction I'm rather tempted to keep going! But not here, and not now! Instead, I'll tell you how you can make your own Pygmy Puff! ^_^

First, crochet a sphere. I made mine in trebles using a 4mm hook and a wool/acrylic yarn blend that was variegated in colour and graduated in thickness. Once you've stuffed the sphere and woven in your ends, you'll need a pet slicker brush. I got mine from a discount store and I think it's used for dogs with really thick coats. Anyway, you brush the sphere with it and it becomes all fluffy. It takes a while to get an even looking coat, but it's worth it.

Then, cut a small circle of felt and brush that as well. You won't need to brush this as much, you just want it to look less flat and perfect. Embroider on a face and attach it on to the sphere. I sewed on the face but I broke a needle doing so, so glue is probably a better option. To make the ears, cut out two little felt triangles. Pinch two of the corners in together and add a stitch through them to make an ear shape. Stitch or glue them on, ensuring that the base is fairly well covered with the fur.


And that's it! You're done! Now you can give your Puff a name and love it forever. Making up background stories is entirely optional. ~_^

Anyway, I hope you like him! Have you been crafting much lately? I just finished my first week back at uni and I'm already missing all of the lovely crafting time that I had on my break! Do you think anyone would notice if I started crocheting during lectures? ~_^

- Lisa x

Wednesday, 10 July 2013

Two art canvases and a recovered faux book


I'm slowly getting through challenges for the Summer Nerd Games on Craftster but last night I had a burst of creativity and completed three projects! Omg, right? I also used up all my double-sided tape ... it was totally worth it though.


I brought a faux book from the Reject Shop ages ago to recover and use with my Steampunk Librarian costume but then I found a much nicer looking one at Typo and I used that instead. But now the first book has finally received its makeover! ^_^

It's quite simple, but I'm happy with how my new copy of "Hogwarts: A History" has turned out ^_^ I just recovered the book with scrapbooking paper, added a metal drawer label for the title, and then added details with my quill and gold paint pen. 

My drawing skills are a bit lacking, so I drew a simplified version of the Hogwarts crest on the cover and just added some details with the gold pen. I think it looks nice nonetheless ^_^
 

I think my favourite part of this project was using my quill - it feels so different to regular pens and it's so fun to use ^_^
 
Then I found a couple of 6x6 inch square canvases in my stash, so I made two more art canvases to add to my little collection ^_^ First up: the polka-dot owl canvas!


I covered the canvas with this blue spotty scrapbooking paper and then set about cutting out circles from several other papers.


Then I drew tiny owls on each one. You can tell they're owls right? (I hope so!)
 

I used my tiny alphabet stamps to add the proverb (courtesy of Albus Dumbledore) and then stuck the circles down with tape and then gave everything a coating of mod podge.

Yay! All done! ^_^ I had proverbs on the brain by this time so I started on another canvas. This one is the "silver linings" canvas ^_^ I love how colourful and happy it is! The little wooden clouds had been in my stash for a while, so it was great to use them up ^_^
 

For the front of this canvas I used a piece of scrapbooking paper from my 6x6 inch paper pad, and then used a complementary piece to cover the sides.
 

I used my silver paint pen to colour in the edges of the clouds as well as draw an edging line on the fronts of them.


Can you believe I used washi tape on only one of these projects? I used five different kinds on this canvas to make up for it ~_^
 

And then finished it off with the tiny alphabet stamps again ^_^
 

And that's it! I've still got two canvases in my stash, so as soon as I get some more tape I'll do something with them too ^_^ The best thing about these projects is that they were all 100% stash! It's great to use up some old supplies ^_^

Do you have a favourite? What's your opinion on scrapbooking style crafts? (I know they're not everyone's cup of tea)

- Lisa x

Friday, 1 March 2013

Bits and Pieces


Hey! Gosh, it's getting close to uni starting now - I am so excited! ^_^ I have been working on a couple of kinda big projects which aren't finished yet, so here are some other things I've been doing ...


I found this set of rainbow seed beads in tiny plastic test tubes! So awesome ^_^ I've been trying to think of something to make with them, but I haven't decided on anything yet.


I've been making a lot of salads and really, really loving these baby beats - yum! ^_^ Colourful lunches are the best!


Washing out paintbrushes makes pretty coloured water, which is also pretty cool ^_^
 

The power went out for five hours one night, leaving me glad that I own way too many candles and also keep tiny battery operated lanterns in my linen cupboard (that's obviously the logical place to keep them ...) ~_^


Scott and I have been watching "Psych" and having fun competing to spot the pineapple in each episode (yes, we're that easily amused!). It's gotten to the stage where I took this photo while doing the grocery shopping to send to Scott and he's been drawing pineapples and leaving them around the house ^_^


My awesome work friends threw a farewell afternoon tea for me ^_^ Theresa even made me a sugar and flour free cake ... but we all decided that baked goods should definitely contain both of those things! The dapper minifig was one of my presents - I also got *a lot* of stationary (they know me so well ^_^)


I finally gave Nana Alma her new convertible mittens - they're the type that she can pull off the covers that go over her fingers and thumbs to turn them into fingerless mitts when she wants to turn book pages and the like.


Nana Alma, Mum, Bec, and I went to high tea at the WA Museum, which was really great! We also saw "Unveiled" which is an exhibition on the history of wedding outfits - it was really interesting ^_^


I've been doing a little bit of embroidery, and also spent a bit of time organising my floss container. Seeing all of these colours together makes me happy ^_^


I made this little brooch which will be part of my Steampunk Librarian costume for Oz Comic Con (it's next weekend - squee!) using a mini life drawing model. To make the sign I wrote on a piece of balsa wood with the quill and ink my parents brought me from Germany. It didn't turn out perfectly neat but I still like how it looks ^_^ I also added a tiny top hat made from Sculpey and drew on a little mustache using my trusty Sharpie ^_^
 

And I finished off these little Harry and Ron brooches ^_^ To make them I just used blanket stitch to attach the fabric cut out to a piece of felt. The fabric is one of my designs from my Spoonflower store.

What have you been working on?

- Lisa x

Sunday, 17 February 2013

Wit beyond measure art canvas triptych


Hello! How have you been? I've been busy working on a Steampunk Librarian costume for Oz Comic Con (can't wait!) and getting things organised because next month I'm going back to uni! Yay! I am super excited ^_^


I made this quote triptych using just a couple of supplies - you might even be able to make this just with the things in your stash!

Here's how I did it:

1. I spray painted the three canvases with gold, silver, and bronze in a random pattern.
2. When the canvases were dry, I used painter's tape to mask off the areas I wanted to retain the metallic mixture look (you can see what I mean if you look at the diamond  - it's not a solid colour inside).
3. Then I went over the canvases again with a solid layer of metallic spray paint - gold for the two with straight lines of tape and silver for the diamond shape.
4. After leaving the paint to dry overnight, I peeled off the tape and then outlined the shapes with a small paintbrush and acrylic paint.
5. Using a Sharpie, I added the quote on the gold canvases. You could also do this with the acrylic paint but my brush handling skills are not that great! ~_^


I like how this kinda looks like washi tape! ^_^
 

The quote on this set is from Harry Potter, and I'm really happy with how it turned out, but now I'm thinking of other quotes that could be turned into more canvas art! ~_^
 

Do you have a favourite quote that you would use, if you made a set like this?

Would yo
u use metallic colours as well, or another combination?

I'd love to hear your ideas! ^_^

- Lisa x