Showing posts with label cooking. Show all posts

Sunday, 4 June 2017

Blast from the past: Pavlamington


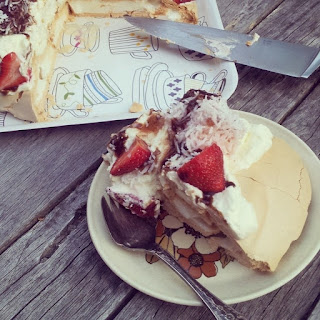
The third blast from the past - and what a blast this was! I was challenged to make an Australian recipe and so I combined two Australian foods, the Pavlova and the Lamington (that we possible also might have stolen from New Zealand), to make the gourmet monstrosity that is: THE PAVLAMINGTON
 

It's basically a huge meringue covered with cream, strawberries, chocolate syrup, and mini chocolate and strawberry lamingtons. It is extravagant and decadent and also very, very tasty.
 

Also, while chocolate and strawberry are the kind of "traditional" flavours for lamingtons, they can really be any flavour. Imagine pineapple and lime mini lamingtons paired with a cream covered meringue, drizzled with lime juice and chucks of fresh pineapple - yum! 
 

This recipe is kind of an undertaking, so if you're going to make this, be prepared to spend a bit of time on it. Or, you know, you could go to the shops and buy a pavlova base and a packet of lamingtons but that wouldn't nearly be as much fun! Here's what you'll need:

Pavlova Base
  • 6 Egg Whites
  • 1 1/4 cup Caster Sugar
  • 2 tsp Cornflour
  • 1 tsp Vanilla Essence
  • 1 tsp Vinegar 
Mini lamingtons
  • 125 g Butter, softened
  • 1 cup Caster Sugar
  • 1 tsp Vanilla Essence
  • 3 Eggs
  • 1 3/4 cups of self raising flour
  •  1/2 cup Milk
  • 2 cup Desiccated Coconut
Chocolate lamington icing
  • 1 cup Icing Sugar
  • 15 g Butter, unsalted
  •  1/4 cup Boiling Water
  • 1/8 cup Cocoa Powder
Strawberry lamington icing
  • 1 cup Icing Sugar
  • 15 g Butter, unsalted
  • 1/4 cup Boiling Water
  • 4 tbsp of Strawberry Jelly Crystals
Toppings
  • Chocolate Sauce
  • Strawberries, chopped
  • Extra Desiccated Coconut
  • 300 ml Thickened Cream

Let's begin! Preheat your oven to 120oC (248F) and line a baking tray with foil. Grease the foil with a little melted butter, and sprinkle cornflour on it, to prevent the meringue from sticking. Whisk the 6 egg whites until they form soft peaks then start adding the sugar. Add a little bit at a time and keep beating the mixture constantly while you do this, until the sugar is completely dissolved. Add the cornflour, vanilla, and vinegar and whisk to combine.


Gently spoon the meringue onto the foil lined tray, making it into a flat circle shape. Bake in the oven for about 1.5 hours. It should feel dry when you touch it, and be slightly browned. When it's cooked, leave it to cool completely before you take it off the tray.


While you're waiting for your pavlova base to cool, you can start making the lamingtons. Keep the oven on, but bring it up to 180oC (356F), and line a rectangle cake tin with baking paper. Beat together cubes of softened butter, sugar, and vanilla until it looks fluffy.


Then add the eggs and beat them in well.


 Mix in the flour and milk.


Put the mixture into the cake tin and bake in the oven for half an hour. If you put a skewer in it, it should come out clean.


Let it cool in the tin for 20 minutes, then turn it out onto a wire rack. This is a kinda massive amount for mini lamingtons, but I wanted to have leftovers for some big ones as well. Feel free to reduce the recipe if you don't think you'll need as much.


While you wait for the lamington to cool, prep the icings. Chocolate and strawberry are the traditional lamington flavours, but I've also seen lemon, raspberry, rose, blueberry, white chocolate, matcha, lime, and Cherry Ripe - so go wild and make whatever ones you'd like!
To make the chocolate icing, mix the icing sugar, cocoa powder, butter, and boiling water in a bowl until you have a smooth consistency. To make the strawberry icing, mix the jelly crystals, butter, and boiling water together until the crystals and butter are dissolved. Then stir in the icing sugar until smooth.


Cut the lamington into small cubes. Using a fork to hold the cube, cover it in icing. Then roll it in desiccated coconut and pop it on a plate to set.
 

Put your pavlova base onto a large plate and beat your thickened cream until it's really, really thick. It's ok if it cracks (like mine!), the cream will cover most errors ~__^
 

Spoon the cream over the pavlova and drizzle with some chocolate sauce.


Add the chopped strawberries, mini lamingtons, more chocolate sauce, and the sprinkle the whole lot with the extra desiccated coconut.


Serve immediately - and make sure you have a lot of friends around to help you eat it all! ~___^


If you ever make a Pavlamington, I'd love to see it! Reading this recipe has made me want to eat it all over again - maybe I'll make another for my birthday ^___^

- Lisa xx

Tuesday, 18 November 2014

Recovered recipe box


Hello! Scott is currently taking some off work and he's been cleaning up a storm. I don't think our house has ever looked this neat, plus we've donated a heap of stuff to the op shop so our karma levels are at a peak ~___^ I've been feeling a bit bad for not contributing since I mostly sit at my computer all day. I mean, I'm doing homework, but it doesn't really feel very productive when you're reading articles all day and then all you have to show for it is a couple of pages of notes! So over the weekend I thought I'd go through our recipe collection and make it so it didn't consist of post-it notes and ripped out magazine pages shoved in an old plastic sleeve.


I've had this paper mache box in the craft room for quite a while, and it's a good size for fitting postcards inside it so I decided to transfer the recipes onto my postcard collection and use the box to store them. However, it was pretty boring looking, so I first needed to make it look pretty! ^___^


I used mod podge to stick scrapbooking paper on to every side of the box and lid but the edges didn't look very neat, even after I had trimmed them down.

So I used washi tape to edge all of the ... edges ... (mmmm, word difficulties!) and trimmed the excess with a scalpel so the ends were nice and flush.


I didn't want to make this box too "this is a box for recipes!!!" in case I decide to use it for something else one day but I did use some tea pot and saucer patterned paper for two sides of the box, and added a "slice of the good life" sticker to the lid which I thought was a subtle reference to what is currently inside.

The "so very lovely" piece of paper on the lid is from another sheet of scrapbooking paper; the kind where the whole page is covered in these little quote like designs and you can just cut out the one you want to use. My kitchen has kind of a retro vibe, mostly because I insist on buying homewares from opshops, so I think the font will help the box fit in with the rest of the decor.
 

As you can see, I've still got a while to go before I get anywhere near filling up this box with recipes! And I must give a shout out to Rebecca for inspiring me to do this project by actually sending me postcards with recipes written on them; I've gotta admit, it's pretty fun to find a risotto recipe in your letterbox ^___^


My final assignment for my degree is due this Friday (gah!!) so after that I'll be trying to finish off this big (well, bigger) project that I've been doing for my brother's wedding. I hope I finish it on time! ^___^

- Lisa xx

Tuesday, 21 October 2014

Death Before Decaf hoop and a Welcome to Night Vale Cake


Last Wednesday was the birthday of one of my most bestest friends, Miss Rebecca. Of course, this meant that a celebration was in order so I texted her asking what flavour cake she would like. I got back "surprise me! But not spiders" and so promptly decided that spiders must be somehow involved (I am cruel in that way). This, in my mind, transformed into spider wolves and from there it was pretty obvious (well, to me anyway) that the cake should be Welcome to Night Vale themed.
 

I do not have a good history of cake making. I think this is mostly because I almost always try to make them too quickly. This means that my cakes are often crumbly, half stuck in the pan, and have a melted look because I tried to ice them without waiting for them to cool down. But not this time! I used my recipe for Anzac Cake but doubled it and made two round cakes. I made two because I was worried one of them would turn out awfully, but, as luck would have it, they both made it out of the oven with only minimal sinking in the middle.
 

I went all out on greasing and lining the pans with baking paper and, lo and behold, both of the cakes were removed from the pans without breaking in half! This is a minor miracle in my kitchen. I let them cool overnight, and then returned with grand icing plans. 


Since both the cakes were looking lovely, I decided to use both of them; so I made some coconut icing (desiccated coconut + icing sugar + water) which I added between the two cake layers. It's probably fair to mention at this point that this cake is not diabetic friendly - I had to take a lot of insulin to eat a slice, but it was totally worth it ~___^
 

The icing on the top of the cake is the same coconut icing, but made purple with the help of some blue and pink food colouring. This icing is pretty thick but is only really good for flat surfaces; it will just fall off if you apply it to the side of a cake. 


So for the sides I made another batch of icing; coconut + icing sugar + water + unsalted butter, which I mixed with an electric beater until it was fluffy. I added food colouring again, but made this batch lighter so that the finished cake would have some contrast. I used a butter knife to apply it; I really love the textured look I ended up with.
 

I have seen some amazing Night Vale cakes in my journeys around the internet, but I knew I was going to have to stick to something relatively simple if I wanted any chance of pulling it off. I settled on a view of the night sky above the Arby's with the Night Vale eye added in at the top.


I used tubes of writing fudge for this, because I had them on hand and because I am totally unskilled with a piping bag. 


The tube was a little too thick to properly recreate the Arby's logo, but I think it's still vaguely recognisable which is really all I was expecting anyway ~___^ For the centre of the eye I used a little bit of the extra butter icing and layered the writing fudge on top of it.

 
And when the candles were put in and lit up here's what we have; a view of the lights above the Arby's! ^___^


As you can probably tell, I had a little fun with creating a Night Vale style photo shoot for this cake; I started off thinking I didn't have much I could use as props but after a scout around our house I ended up with my LSP headphones, some plastic spiders from our Halloween decorations, and a tiny chemistry shot glass set (I have never done a shot in my life, but I also can't resist teeny glassware so ...). I also printed out the flyer for Big Rico's Pizza and an Alert Citizen Card which are now on my fridge; I think they really made the scene! I am ridiculously pleased with how this cake turned out. I made Scott and Rebecca admire it multiple times before we were allowed to eat it ~___^ 


And I can report that it was delicious; the cake was moist and held together well, and the coconut icing is a great combination with the Anzac biscuit flavour. It really was a bit enormous though, especially since there were just three of us celebrating that night. As a result, I have eaten way too much cake in the last week. My taste buds love me, the rest of my body ... ehhh, probably not so much. Still, that's what exercise is for, right? ~___^


I also made Rebecca this Death Before Decaf hoop using a pattern from Urban Threads. I think I've mentioned before how much I like their patterns; they have some great designs and I always end up buying more than I need when I visit their site. This hoop is kind of a matching pair with the Eat Your Greens hoop that I made for Bec earlier, but I think the white stitching is a lot easier to read against the purple fabric than it is against the green.
 

As per usual I printed out the pattern onto thin paper and then stitched the main part of the design through the paper. I had to spend a while ripping off the paper at the end, but it really does do a good job of ensuring that the design is replicated accurately. I would still like to try out different embroidery transfer methods, but that will have to wait until next year when I (hopefully!) have a job which allows me extra disposable income to spend on craft supplies ~___^


After I had stitched the main shapes down and removed the paper, I went back and did all the little sketchy details and the thicker sides of the "death" and "decaf" letters.
 

The roses are one of my favourite parts of this hoop; I just think they look fab. I also really like the curving ribbon which holds the text. When I first did it it looked a bit meh, but after adding in all those little lines on the back of the ribbon and the little curving details it really transformed into something special.
 

I also really love the cute little skull tea cup. This hoop would be a great present to give with a tea set and some tea bags or coffee beans. (Non-decaf includes tea, right?)

My husband, who seemingly can't live without iced coffee, was a big fan of this hoop too; I'm kinda tempted to make up another one for him/ our hoop wall. But I think that will have to wait until I regain feeling in my pointer finger ~___^


I've got one of my final assignments due this week, so I guess I better get back to doing that. However, I will be back next week with more Halloween projects (I realise that this post is not totally Halloween-y ... but it had a skull in it so that counts, right?? ~___^). I hope it stops raining so that I can do some outdoors crafts; but only time will tell!

- Lisa xx

P.S. Another big "Happy Birthday" to Bec; I hope you had a super fantabulous day ^___^


Sunday, 22 April 2012

The photo challenge continues!


Hey! How has your weekend been? Mine has gone really fast, which I think is because I had to work on Saturday - boo! >_< Anyway, here's more pictures for the month of craft photos challenge, plus what I've been up to lately.


Day 8: Most challenging FO. This was really hard to choose! I eventually picked Penelope because while I would re-make most of my projects, I would never make another giant squid plushie. Penelope is bigger than me (not tricky for most people as I'm only 5"3', but impressive for a soft toy) and took a lot of manoeuvring on the sewing machine to complete. I love her though ^_^


Day 9: Shadow. There are lots of shadows around here, but not so many pretty ones. I like the shadows my two-tier cake display makes though, plus the stand itself is very pretty ^_^


Day 10: A crafty gift. This owl gauge for knitting needles was a one of those free gifts from the front of a magazine. Still counts, right? ^_^ It's a lovely mint green, which is one of my favourite colours at the moment.


In other news, I cut my fringe, found this lovely vintage-looking shirt dress, and got up the courage to take and post a photo of myself not wearing make-up. Maybe next I'll be able to post a photo of myself that doesn't stop at the torso - ha ha! ^_^


And I spent this morning baking biscuits for a little tea party this afternoon. This copper cookie cutter is so sweet! The biscuits are my own recipe, and I'm really pleased that they turned out well ^_^

Here's the recipe for you:

Vanilla, Cinnamon, and Golden Syrup Biscuits

185g of softened butter
3/4 cups of sugar
1 teaspoon of vanilla extract
2 teaspoons of golden syrup
3 teaspoons of ground cinnamon
3 tablespoons of olive oil
2 cups of flour

1. Heat the oven to 180oC and line flat trays with baking paper.
2. Beat the butter, sugar, and vanilla in a large bowl until pale and creamy.
3. Add the golden syrup, cinnamon, and olive oil and continue to beat until well combined.
4. Sift the flour into the bowl and stir with a wooden spoon to combine.
5. Turn out the dough onto your counter (I put a sheet of baking paper over mine first) and knead until soft and not crumbly. If your dough seems a little too crumbly, return it to the bowl, add a bit more olive oil, and knead to combine.
6. Roll out with a rolling pin, cut into shapes, and transfer to baking trays.
7. Bake for 10 - 15 minutes or until golden brown.
8. Once cooked, let the biscuits cool slightly on the trays before transferring them to a wire rack to cool completely; this is especially important if you're using large, delicate shapes like the teapot above.
9. Eat one to check that they're ok to serve to friends ~_^

I hope your weekend is super awesome and if you make some biscuits from this recipe, I'd love to know if you liked them ^_^

- Lisa x