Sunday 29 September 2013

Make (craft) love, not war: toy soldier jar toppers


Hello! Did you play with toy soldiers when you were little? I didn't, yet for some reason, I had two big packets of them in my craft room. I collect a lot of weird things because I think I'll do something with them, and in this case I actually did!


I *always* need more craft storage, and I kinda hate throwing away jars (even though I do recycle them ... it's just the latent hoarder in me, I think! ~__^) so I decided to make some jar toppers to pretty up my craft room a little ^__^
 

These were really easy to make too! Here's what you'll need:

- toy soldiers
- clean jars
- thin craft wire
- glue
- spray paint
- thin plastic or cardboard (I diverted some cartons from my recycling bin for this purpose) 
- wire snippers 
- craft scissors
 

Firstly you'll need to cut out some small hearts from the cardboard or plastic. I used four, because I wanted one soldier to have two hearts, just to add in some variety.


Then cut a short length of wire and give it a little bit of a twist. Check out the photos below for some close-ups of the wire (it's probably easier than me trying to describe it! ~__^)


Use your glue to attach the heart to one end of the wire, then attach the wire to the end of the soldier's gun.


Since you've already got your glue out, stick down the soldier onto the jar lid ^__^


Then all you need to do is wait for it to dry, and then give everything a coat of spray paint. I *was* going to use cherry red, but I ran out! Oh no! Since I'm still trying to stick to my commitment of not buying new craft supplies, I used white instead. I'm actually glad though, because I think it gives the jar toppers a kind of ceramic look ^__^


Then you can fill them up!

I used my jars to hold some skeins of embroidery thread, my fabric pens and measuring tape, and my sewing machine threads. You could also use this for bathroom or kitchen storage, or even as cute way to corral all that wayward stationery on your desk! (Oh, wait ... is that just me? ~__^)


Whatever you think you'd use these for, I hope you like this project! Now, to think of a way to use up the other 1756 soldiers still languishing in my craft room ... ~__^

- Lisa xx 

Saturday 21 September 2013

Sweet tooth plushie with free pattern


Hello ... do you have a sweet tooth? No? Would you like one? ^__^


This project has been on my list for quite a while, but last night I finally decided that I couldn't wait any longer and quickly whipped up this little fella with 100% stash items. Huzzah! ^__^

This wide eyed smile is calculated for maximum cuteness level, so I know you'll all want one of your own ~__^


 So I made a pattern for you! Yay! ^__^ Click on the image above to download the .pdf from my Google Drive (and, as always, let me know if you have any problems! ^__^)


To make your own sweet tooth plushie, you'll need;

- white fabric (I used some new jersey that for some unknown reason I had in my craft stash, you could also use cotton, fleece, felt, an old t-shirt ... anything really!). The pattern is sized to print on an A4 page, if you make it that size, you'll need about half a meter of fabric. 
- black and red fabric scraps. You only need a very small amount of fabric to make the face. I used felt because it doesn't fray ^__^ 
- toy stuffing
- white, black, and red threads
- sewing machine. This is probably optional, but I find sewing plushies much easier with a machine, because the seams are much less likely to come undone.

Then all you have to do is cut out two tooth shapes from your white fabric, sew them together (leaving a gap in the seam), turn it inside out, stuff, and then add the face! You could also add the face on first, if you're not forgetful like me ~__^

Yay! I hope you like this little sweetie ^__^ And if you make one for yourself, I'd love to see!

- Lisa xx

Monday 16 September 2013

Mathmatical! Free Princess Bubblegum embroidery pattern


Hello! Do you go through phases where you listen to the same songs over and over and OVER again? I do, and I'm sure it's highly annoying for Scott ~__^ After I've become obsessed with a song, then I always tend to want to craft something inspired by it (further evidence of this can be seen here and here ^__^)

Anyway, lately I've been listening to SO MUCH Marina and The Diamonds. It's funny because I wasn't obsessed with her music when I first heard it on the radio, but a week or so ago I was on a YouTube exploration and listened to "Bubblegum Bitch" and then the obsession started.


So, rather than finish any of my WIPs or actually take proper photos of any of my finished projects, I decided to make up this embroidery pattern, featuring the highly magnificent Princess Bubblegum ^__^ 


Click on the picture above to go and get the .pdf. Yay! ^__^

Now .. should I go and finish WIPs or start a new project inspired by Marina's "Radioactive" song? ~__^

- Lisa xx

Saturday 7 September 2013

Shrinky dink and felt brooches


Hello! I've been meaning to make a few new brooches for a while, as since I've been doing Novelty Brooch Friday on Instragram, I've been going through my collection at a rapid rate! I *may* have gone slightly overboard today though ... Really I just wanted to procrastinate on my homework for a bit longer! ~__^


First up is this little black poodle! It's the twin to the one I made for Pip a while ago, and I finally got around to finishing it off. It's made from shrinky dinks and turned out quite well. It does have a little lump on its chest area - I have difficulty getting shrinky drinks perfectly flat! Is there a trick to it? Or it is just luck?
 

Anyway, I think I'd like to make some other puppies as well. I'd love a little dachshund brooch! ^__^
 

I have a slightly weird love for ampersands. I can't explain it, I just think they're great ^__^
 

 I've wanted some puncuation jewellery for ages, so I'm really pleased with this! Like the poodle, this ampersand is also made from shrinky dinks ^__^ I think an interrobang will have to be on the to do list next ...


 This brooch is made from some of the leftover flowers from my Frida Kahlo head band. It turned out better than I thought it would! ^__^


 All I did to make this was glue the flowers onto a circle of green felt. I added a few little leaves to balance out all the warm colours and to fill up a couple of gaps ^__^


Anything anatomical is always my favourite, and I've wanted a heart brooch for ages ^__^
 

I used white shrink dinks for this brooch; the white sheets I have are slightly transparent when unbaked so I placed my reference image underneath and traced it. I'm not very good at drawing freehand, so that made it a lot easier! ^__^


I used the white shrinky dinks for this one too (I feel like I've written "shrinky dinks" in this post so much that it's beginning to lose meaning ...)
 

I used coloured permanent markers to colour this a semi geometric pattern. Up close, you can see what an awful colour-in-ier I am. If you look at that previous sentence up close, you can also see how badly I butcher the english language ~__^
 

It looks fine from a distance though! ^__^


Another ampersand, another shrinky dink project! Are you sensing a theme here?
 

I left this one plain as I don't have many white badges, and neutrals always come in handy ^__^


Lastly, these two purple flowers became two cute little brooches with the addition of some leaves. I was tempted to make these into earrings, but they really are a bit too large for that. But having two the same means that I am able to wear them as sweater clips should I wish to ^__^
 

And that's it! Omg, right? ^__^

Now, I best go and actually do some homework! Oh, who am I kidding ... I'm going to go and finish knitting my hat for the Foxy KAL! ~__^

- Lisa x

Sunday 1 September 2013

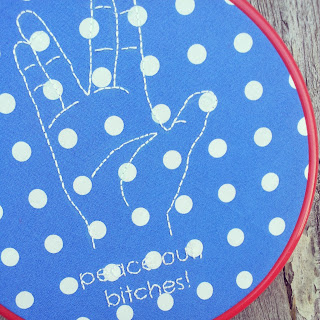
Peace out, bitches! Charlie Bradbury inspired hoop


Hello! Guess what? I'm on study break! Yaaayyyyy! ^__^ I actually *do* have to spend the week studying (my tutors this semester are very keen on homework and assignments) but I have had a lovely relaxing weekend. And I have a craft to show you!

This hoop is inspired by Charlie Bradbury from Supernatural (played by the ever-awesome Felicia Day).
 

Charlie is a cosplaying, LARPing, computer hacking genius who regularly makes nerdy references. Seriously, how could you *not* love her?

Charlie's combo of "peace out" and the Vulcan Salute has become one of her most famous quotes, and I simply *had* to make it! ^__^


I used a bright red vintage embroidery hoop and some blue and white polka-dot fabric. I probably *shouldn't* have used white thread, because over the polka-dots, the stitching is a bit hard to see.


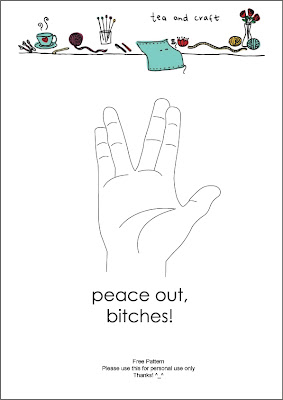
I struggle with embroidered text, so I am so, so happy with how this font turned out! Normally I trace the pattern onto my fabric using a transfer pen, but this fabric was too dark for that method. So, I cut out the segment of the pattern with the words, pinned it onto the fabric, and then stitched directly over the printed letters. After I'd stitched the phrase, I ripped and pulled the paper out from between the stitches. It wasn't that hard because the stitching perforates the paper, but next time I would use a thinner paper. I used regular printer paper this time, and I was worried about pulling up the stitches.


I made a little pattern for you to use as well! Click on the image to go to Google Drive, where you can download the .pdf ^__^
 

Now I'm off to work ... and after that I'll be casting on the Foxy KAL that Tanya and I are organising! It starts today, and I am so excited! ^__^ We'd love to have you join us!

Live Long and Prosper!

Lisa x