Showing posts with label cat. Show all posts

Sunday, 2 July 2017

Blast from the past: No Knit Kitty Hat


I often really like looking at fancy knit stitches but I am so not good at making them. What I am good at though is thrifting! And you too can make a knit hat with absolutely no knitting skills! (Although I do still want to get better at knitting ...)


I made my hat a kitty cat hat, because why not? Mine is a black cat, but yours could be any colour ^___^
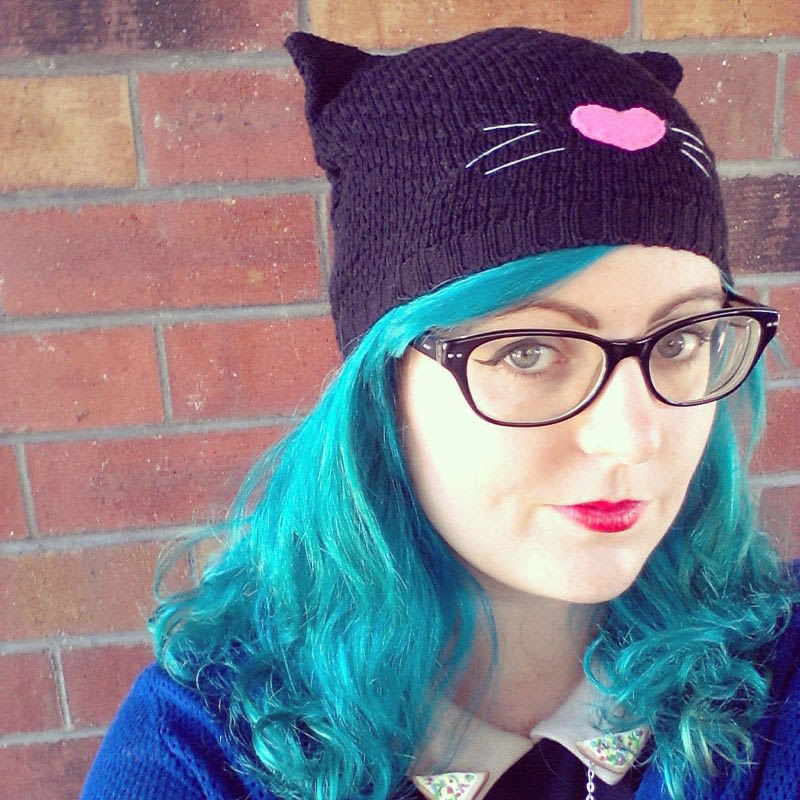
 

First step: go to the op-shop and buy yourself a sweater! It doesn't matter if it's an ugly or ill-fitting shape, but choose one that has ribbing around the edges and a nice looking stitch pattern. I used a cardigan, but a sweater is preferable because you get more fabric to work with!
 

If you're using a cardigan, fold it so that the ribbing around the neckline and the hem is matched up. If you're using a sweater, just lay it flat and ensure the ribbing around the front and back of the hem is matched up. Use a hat that you like as a template for your shape; add pins around it, plus a little extra for seam allowance.


Cut out your new hat shape!


Cut out four cat ear shapes.


Match up your cat ear shapes, making sure they are right sides together. Sew around the sides, leaving the bottom open, using blanket stitch or a sewing machine. Turn your cat ears the right way out.
 

Turn the fabric of your hat shape so that the right sides are together. Put the cat ears in the position you want them, making sure they are between the two hat pieces and pointing inwards. Add pins around the edge, leaving the bottom open, and sew together by hand (with a blanket stitch) or using a sewing machine (using a zig-zag stitch) or by using an overlocker.


Use a scrap of felt to make a heart shaped nose and add some whiskers with embroidery floss. Purrrfect!


- Lisa x

Tuesday, 14 July 2015

Brooches, leather stamping, and glass painting


Hello! I wasn't sure what to show you today, as I haven't finished any new projects this week. However, I do have some little projects that I haven't shown you before so now I figured you could see all of them! ^____^


 I made this brooch for my friend Clare as a "leaving Perth" gift. I designed the image using Illustrator, printed it out, glued it to balsa wood, cut it out, coated it with mod podge, and attached a badge backing. Unfortunately, since I'm such a procrastinator, I didn't have time to take any photos of it before getting to the pub and giving it to Clare!


Luckily, she didn't mind me stealing it back for a few quick snaps ~____^ The tiny banner says "home is where the heart is", but Scott said I should have made it say "they can break a man's arm you know!" (you'll have to watch Hot Fuzz for that reference!) The brooch image is of a black swan on the Swan River (yup, that's what we called it! Clever and original, huh?), in front of the Perth skyline. I drive around and over the river on my way to work and the city, and I always love seeing the swans. I hope they will remind Clare of some fond Perth memories while she makes her new life in Melbourne ^___^


I used basically the same technique to make myself this Glow Cloud brooch. I used scrapbooking paper for the background, and a pen to write on the letters, and then mod podged it onto the balsa wood. I also coloured in the edges of the brooch with a black sharpie, which I really like the look of.
 

I made these little key ring charms for my brothers using leather, metal stamps (courtesy of Bek who knits), a black felt-tip pen, rivets (courtesy of Bec), and some large jump ring type things. As you can see, the red leather has more texture which made the stamping a little less visible; the black pen helps with that a bit, but overall the green leather worked out the best. I haven't actually given Brett his gift yet, but he doesn't read my blog so I think we're safe ~____^ Craig liked his, which was a pleasant surprise as they don't often appreciate handmade gifts.


I also made a key ring charm for Scott; this one is done on black leather but the stamping actually showed up quite well! Perhaps by this time I was actually using enough pressure when hitting the stamps ~____^


Emma from A Beautiful Mess painted some gorgeous cactus bottles, and I decided I simply had to give it a go myself! I don't have many colours of glass paint, but I had the primary colours so I mixed up some green and got painting. I've been using them as water bottles, which I think is much nicer looking than constantly reusing old plastic bottles. When I'm not using them, they also make a pretty little garden on my kitchen windowsill ^___^


And since I had my paints out, I decided to decorate the jars I use for making chia puddings and overnight oats in. I did some gems and an ice-cream cone, but my favourite is Space Kitty! They certainly brighten up my mornings ^____^

I've got skating tonight, and I'm sincerely hoping it's not as cold as last week - we were all breathing out fog and steam actually came off our limbs when we took off our knee and elbow guards! Brrr - think warm thoughts for me, please!

- Lisa xx

Tuesday, 3 March 2015

What's new, pussycat? Kitty necklace from a beaded bracelet


Hello! I think I have finally gotten back to mostly good health, just in time for my first week of roller derby skills training tomorrow! I am so excited, and also quite nervous. I don't know about you, but for me crafting is a fantastic form of stress release and so, despite my illness, I have managed to start a few projects this last week. Of course, starting a project doesn't necessarily mean finishing it (my WIP crate can attest to this!), but there are exceptions ~___^


I brought the bracelet below while I was in Singapore, but soon realised that it was too big and too heavy for me to really want to wear around my tiny baby wrists. I didn't want those adorable kitty beads to languish in my jewellery box forever though, so I cut the elastic cord of the bracelet and reconstructed it into a necklace ^___^
 

I like it much better this way! I wanted to let the cat beads take center stage on the necklace, so I didn't complicate it overly.
 

I threaded one crystal bead onto a headpin, added one cat bead, and then trimmed the wire and twisted it into a loop which I then attached directly onto the necklace chain. You could use jump rings for this, but I felt having two jump rings between each headpin and the chain looked a little too busy. After attaching all the cat beads, I just added a lobster clasp with jump rings to attach the ends of the chain.
 

There are eight cat beads on the necklace, which is a deviation from my usual preference for odd numbers, but eight is a lucky number so I figured I would do well to keep all the cats together ~___^
 

One other thing that happened recently was that Frankie Magazine shared a photo of my knitted pineapple tea cosy that I made for the Giant Pineapple KAL! My pageviews went through the roof, so welcome if you've found this little corner of the interwebs via Frankie! If I'd known I was about to have so many visitors I may have tidied up a little bit ~___^

I'm picking up my sewing machine from the repair shop tomorrow and I can't wait to finally make some headway on my alterations pile! Shortened straps and taken-in waistbands aren't all that interesting to other people though, probably, so I'll simply have to make some new things as well. What a shame ~___^

- Lisa xx


Wednesday, 4 February 2015

Kitty mugs: round two!


Hello! I was hoping to have another craft finished to show you today (well, actually yesterday since this is late now ...) but instead I did some research (ugh, responsibility). So, instead ... MOAR KITTIES ^____^


These were actually the first kitty mugs I painted, but since they were for a gift, I couldn't show them to you. But they have now been gifted - yay! ^____^ I made these for my friend Philip for his birthday; Philip likes cats and visiting Japan so I made him some Japanese kitties!


I looked up some photos of traditional Japanese costume but, well, it's kinda hard to draw clothes on cats so they're probably not very accurate.


Each mug has konichiwa written on the back in Hiragana; which I don't read or write so, again, this may not be accurate! But Philip liked them, so I'm super pleased with that! I also made him a caramel sponge cake, but totally forgot to take a photo of it before we all devoured it. I'll just have to make it again some day! ^___^


And I also made this knitty kitty mug for my friend Catherine, for making me the awesome hand-dyed yarn in the photo! It's sooo beautiful! I haven't decided what to make from it yet, because I want to choose the perfect project ^____^

I've almost finished my other project, so I'll show you that next week! It's another Night Vale inspired craft, so I'm super excited to get it done ^____^ After that, I want to make something for my skating; I don't know what yet, but whenever I get excited about something, I want to craft for it! Any suggestions? ^____^

- Lisa xx

Tuesday, 27 January 2015

Kitty Tea Cups


Hello! When I first moved out of home I brought, like I'm sure many people do, a big box of plain white plates, bowls, mugs, and tea cups. But, I never really used the mugs or tea cups because I had cuter options. Let's be real: things taste better when they're drunk out of awesome cups. This is a fact. ~____^ But, this seemed like a huge waste so I decided to get out my porcelain paint pens and cute-ify these babies up!


I saw this super cute French kitty by Brave Moonman and was totally inspired so I spent a while scribbling out some dressed up cats ^____^ I started out by painting the cats entirely in black (my pen is getting a bit worn out now!) but then decided they needed a little something something so used my other pens to add some pops of colour ^___^ Anyway, let's meet the kitties!


Library Cat is wearing an outfit that is inspired by an actual outfit I have worn to work. Polka-dot blouse with pussy bow (appropriate, no?), pearls, glasses ... what could be more libraryesque? ~___^

Piano Cat is looking swish in her Peter Pan collar and stripes, plus a cute little daisy tucked behind her ear.

And Sewing Kitty has a pair of scissors tucked into her belt, a pin-cushion attached to her tail, and a couple of rolls of fabric with which I'm sure she'll be creating something special!


Scott's favourite cats were the Baking Kitty (suggested by the lovely Sam on Instagram) and the Lumberjack Cat so I painted them onto the larger mugs (he's not really a tea cup kinda lad).


Lumberjack Cat makes me giggle every time I look at him; that beard! 


And Baking Kitty is pretty cute too - somehow that expression just looks so satisfied at the mess he's made! ^____^

I've painted a couple more cats, but they're gifts so they're secret for the moment ^___^ I think I need to get some more mugs though - Space Cat *needs* to be painted!

- Lisa xx 

P.S. Find more kitty mugs here!


Tuesday, 14 October 2014

Perler bead witch kitty Halloween wall art


Hello! This week it was a race between two projects to see which I would finish on time for this post; my perler bead witch kitty won! This project is pretty obviously closely related to the kitty banner I posted last week. I started off that project thinking I would make five cats and have them all on a string as a banner but then I changed my mind. I used the two green cats for the banner because they kinda seemed to go together, and I was left with this witch kitty.


I've been working on an embroidery hoop hoping that I would finish it in time to post it today but since I've been doing more homework and less crafting ... it just didn't get done. I figured that since the perler bead cat was already made this would be a fast project to finish off.


I'd had this wooden hoop in my stash for a while; it's not an embroidery hoop, it's just a ring made out of what looks like either cane or vine. I have no idea why I have it, but it came in handy for this project ^____^ I wrapped it in orange wool, securing the ends with a bit of hot glue.
 

I also used hot glue to attach the cat to the ring once it was wrapped, but it still needed something. I brought these paper pendants from the scrap booking store; they are made by American Crafts and they come in a pad, so you just tear one off when you want to use it. I decided a pun was the perfect thing to add, so I got out my liquid chalk pen and added this little line.
 

The pen tip was a little thick, so I probably would have been better off with finding one of my metallic paint pens but I wanted to create a kind of blackboard look and I think that it does work in that sense.


I used some black and white baker's twine to attach the pendant and add a hanging loop and then hung it up next to some free postcards that my library has been giving out. Skulls and zombie hands? I'm pretty sure that ups the coolness levels of my job significantly! ~___^


My next Halloween project won't have anything to do with cats, but please do forgive me if I post it late. My university workload seems to be increasing no matter how many hours of study I put in and since it is my final semester I am really getting quite stressed about the prospect of not doing as well as I think I should. As I've been saying to approximately everyone lately; I can not wait until this semester is over! The end is within sight and I'm desperately hoping that once I graduate I will find a nice, calm 9-5 job that allows all my spare time to be spent crafting ^___^ Only four weeks to go ... the countdown is on!

- Lisa x

Tuesday, 7 October 2014

Frankenkitty and Zombikitty Halloween banner


Hello! As promised, here is the first of my Halloween projects. Yay! ^___^ I've been meaning to make a banner to go above my TV for a while now, so I figured this was the perfect opportunity. I used some cute cross-stitch patterns to make the two perler bead cats; one is a Frankenstein's monster and the other is a zombie. They're more cute than creepy though!


I'm not sure what this type of fringing is called (all I know is that it reminds me of the kind of dresses flappers used to wear) but I've seen it used on a few banners before and since I had some in my stash I figured it would be the perfect thing to use ^___^


All in all, this was a really easy project to make. Creating the kitties took a bit of time, as perler bead projects normally do, but I made them while catching up on TV shows so it wasn't so bad ^____^ The cats are about the size of my hand, so the banner is eye-catching, but not massively huge.

My favourite parts are the glow-in-the-dark perler beads; can you tell I'm kinda obsessed with glowing things at the moment? ~___^ After I had finished ironing the cats (and leaving them to cool down) I used hot glue to attach them to the fringe banner, and I also attached a loop of wool on their backs to use for hanging.
 

I used some glittery silver "thickers" (yes, that's really what they are called!) to spell out the words; since they have sticky backs I just pressed them onto the fringing. I may need to reinforce them with glue later on, but they are doing fine at the moment! ^___^

I wish I had a fireplace to create a display above, but for now my TV will have to do! I've added the glittery skulls I made to the top to pretend that I have a mantelpiece ~___^

In other news, I've only got five more assignments to go this semester! They're all big ones, but I'm excited to be nearing the end of my degree ^___^ Now I'm just hopeful that I can find a job in my field! Fingers crossed, hey? 

- Lisa xx

Sunday, 13 July 2014

Braids, cats, and galaxies: jewellery making


Hello! As is apparently typical for me during holidays, I have been suffering a little from crafter's block. It's rather frustrating! As soon as I have plenty of time to work on projects, I start feeling aimless and unsure of what to make; add in a couple of failed crafts and I'm not a happy camper! So I decided to fall back on jewellery making to help me get my mojo back ~___^


Although I did do crafts as a child, jewellery making was what roped me back in as a teenager. There was a huge trend of wearing beaded necklaces and earrings when I was in high school and I gleefully jumped on the bandwagon; I brought tons of tiger tail and seed beads and spent lunch time selling my creations from a small container in my school bag. I still have a pretty extensive collection, even though I haven't brought any beads for years. I think maybe they multiply somehow? ~___^


Anyway, this necklace was super easy to make, and finally creating a successful project was very satisfying! ^___^ To make this, I cut three lengths of tiger tail and formed one end of each length into a loop using crimping beads. I threaded each length with a different colour seed bead (pink, blue, and clear, as you can probably tell) and then crimped the other ends into loops as well. Then I used a jump ring to gather the beaded strings just on one end, braided the lengths, and added another jump ring at the other end.


Once I had my beaded braid complete, I attached chain through both jump rings. If you wanted a long necklace, you could stop here, but I wanted mine to sit higher up so I cut through the middle of the chain and added a lobster clasp. It's a relatively stiff necklace, it doesn't have much drape and it's a little heavier than you would expect it to be, but it's still comfortable to wear and I think it looks really pretty ^___^


Since jewellery was working for me, I decided to make a cute little ring from some shrinky dink scraps. I find it really hard to throw out cut offs of shrinky dink; it's like, that could totally be something! In this case, one scrap I had was large enough to make a tiny kitty face.


I ran out of E6000, and haven't yet gotten anymore, so I used Tarzan's Grip for this, which I hadn't used before. This glue swells up and becomes puffy as it dries, so I would recommend using less than you think you should. I had to cut away some of the excess dried glue from this ring, but at least I know for next time! ^___^


Lastly, I made these galaxy pendants. I found some great images on tumblr of nebulae and since I kind totally missed out on the galaxy trend a few months ago, decided to make something for myself. I couldn't decide between the pictures though (they're all so gorgeous!) and so I ended up making three.


I'm not sure if these are super recognisable as space images though, and I think if I make any more I will add some glitter to the pictures. To make these I used some epoxy stickers which I positioned on top of the images; I trimmed the excess paper and then glued the domes into pendant cabochon settings. I added chain to one of them so I could wear it to work today, and I'm thinking about turning the other two into brooches ^___^ 


I've got some hair clips drying on my craft table at the moment, so I'll show those to you next post. In the meantime, fingers crossed my crafting block is a thing of the past! ^___^

- Lisa xx